Bree Photo Selections & Quick Mask
Note: Screenshots in this tutorial may show GIMP branding, but all menus, tool names, and keyboard shortcuts are identical in Bree Photo and the steps can be followed directly.
Selections are one of the most frequently used tools in image editing. They restrict edits to a specific area of the image without affecting the rest. Quick Mask provides an intuitive way to paint selections directly.
Creating Basic Selections
Bree Photo provides several selection tools, accessible through Tools → Selection Tools:
- Rectangle Select Tool
- Ellipse Select Tool
- Free Select Tool (Lasso)
- Fuzzy Select Tool (Magic Wand)
- Select by Color Tool
Using the Rectangle Select Tool as an example:
- Select the Rectangle Select Tool in the toolbox, or press
R. - Click and drag on the canvas to draw the initial selection.
- Release the mouse button; the selection edge appears as animated “marching ants.”
If the layer has no alpha channel, deleting the selection contents fills the area with the background color. To enable transparency, first choose Layer → Transparency → Add Alpha Channel.
Moving and Adjusting Selections
Rectangular and elliptical selections have two modes:
- Mode with handles (default): resize handles appear around the selection. Drag inside the selection (but not on a handle) to move it.
- Mode without handles: press
Enteror click inside the selection to confirm and hide the handles, leaving only the dotted outline. Click inside again to bring the handles back.
Moving the Selection Outline Only
Click and drag inside the selection (away from the handles) to move just the selection outline without moving image content:
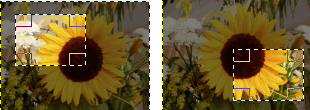
You can also place the pointer inside the selection frame and hold Alt (or Ctrl+Alt) to nudge it one pixel at a time; add Shift to move 25 pixels at a time.
Moving the Selection and Its Contents
Hold Ctrl+Alt and drag the selection to move the layer contents inside it. The original location is filled with the current background color:
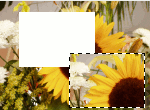
This creates a floating layer that must be anchored to the layer below or converted into a new layer.
Copying the Selection Contents
Hold Shift+Alt and drag the selection to copy the contents to a new location while leaving the original untouched:
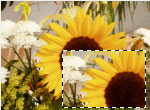
Note: On some systems you must press
AltbeforeShiftorCtrl. PressingShiftorCtrlfirst enters add/subtract selection mode, after whichAlthas no effect.
Using Quick Mask
Quick Mask lets you edit selections as if you were painting, which is especially useful for objects with complex edges.
- Open an image or create a new document.
- Click the Quick Mask button at the bottom-left of the image window to enter Quick Mask mode. If a selection already exists, the mask is initialized from it.
- Choose any painting tool (brush, eraser, or bucket fill):
- Black: removes areas from the selection
- White: adds areas to the selection
- Gray: creates partial selection (translucent effect)
- Click the Quick Mask button again to exit Quick Mask mode; the selection appears as marching ants.
While in Quick Mask mode, you can also use selection tools and fill them with the Bucket Fill Tool without destroying the existing Quick Mask selection.
Deselecting and Inverting
Select → None(Shift+Ctrl+A): remove the selectionSelect → Invert(Ctrl+I): invert the selectionSelect → All(Ctrl+A): select the entire layer
Conclusion
Once you are comfortable with selections and Quick Mask, you can precisely control where edits apply and prepare for more advanced techniques such as layer masks, color adjustments, and compositing.
Source & License
This tutorial is adapted from the GIMP Documentation Team’s Creating and Using Selections and Using Quick Mask Mode.
This document is licensed under the GNU Free Documentation License, Version 1.2 or later; with no Invariant Sections, no Front-Cover Texts, and no Back-Cover Texts.