Bree Photo Paths
Note: Screenshots in this tutorial may show GIMP branding, but all menus, tool names, and keyboard shortcuts are identical in Bree Photo and the steps can be followed directly.
Paths are vector outlines based on Bézier curves. They are ideal for creating precise, editable complex shapes. Unlike selections, paths can be saved, adjusted, and converted to selections, strokes, or fills at any time.
What Paths Are Used For
- Convert to selection: closed paths can become selections for cutouts or local edits.
- Stroke path: paint along the path with a chosen color, width, pattern, etc.
- Fill path: fill the interior of a path with a color or pattern.
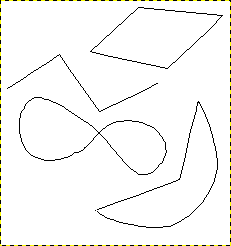
The figure above shows four typical paths: a closed polygon, an open polygon, a closed curve, and a mixed straight-and-curved path.
Creating a Path
Activate the Paths Tool:
- Menu:
Tools → Paths - Toolbox icon: pen-like curve tool
- Keyboard shortcut:
B
In the Tool Options panel, set Paths Edit Mode to Design.
Adding Anchor Points
- Click on the canvas to create the first anchor point.
- Move the mouse to a new position and click again to create a connected segment.
- Continue clicking to add more anchor points.
While adding points, a small “+” appears next to the cursor, indicating that the next click will add a new point.
Closing the Path
Move the cursor back over the first anchor point and click to close the path. When finished, press Enter to convert the path into a selection.
Adjusting Curves
Move the cursor close to a line segment and drag it to bend the segment. Two direction handles (handles) appear:
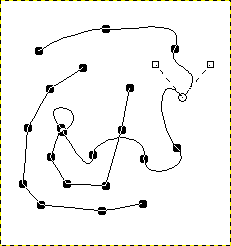
- Black squares: anchor points
- Open circle: the selected anchor point
- Open squares: direction handles
Drag the handle ends to change the curve direction and length; drag the anchor point itself to move its position. Hold Ctrl while dragging a segment to adjust only one side’s handle.
Path to Selection and Stroke
Once a path is drawn, you can use it in several ways:
- Path to Selection: right-click the path in the Paths dialog and choose Path to Selection (or press
Enter). - Stroke Path: right-click the path and choose Stroke Path, then set line width, color, or pattern.
- Fill Path: right-click the path and choose Fill Path, then choose a color or pattern.
Saving and Editing Paths
Paths are listed in the Paths dialog and are saved with the XCF file. You can reselect a path at any time and continue editing:
- Switch to Design mode to add or move anchor points.
- Switch to Edit mode to add new anchor points along existing segments.
- Switch to Move mode to move the entire path.
Conclusion
Paths are a powerful tool for precise cutouts and graphic design. Although Bézier curves take some practice, mastering them lets you create smooth, professional outlines and shapes.
Source & License
This tutorial is adapted from the GIMP Documentation Team’s Paths.
This document is licensed under the GNU Free Documentation License, Version 1.2 or later; with no Invariant Sections, no Front-Cover Texts, and no Back-Cover Texts.