Bree Photo Layer Effects
Note: Screenshots in this tutorial may show GIMP branding, but all menus, tool names, and keyboard shortcuts are identical in Bree Photo and the steps can be followed directly.
Layer Effects provide a non-destructive way to edit: you can overlay filter effects on top of a layer without permanently changing the layer’s pixels. Even after performing other operations, you can return and adjust the effect parameters.
What Layer Effects Are
Layer Effects are a class of adjustable filters. Unlike ordinary filters:
- They do not permanently alter the layer content.
- They are saved in the XCF file and remain editable after reopening.
- They apply to a single layer only.
- Most GEGL filters can be used as layer effects.
When a layer has effects, an fx icon appears next to the layer name in the Layers dialog:

Adding a Layer Effect
- Select the target layer in the Layers dialog.
- Open a filter that supports layer effects, for example
Filters → Light and Shadow → Drop Shadow…. - In the filter dialog, look at the Merge Filter checkbox:
- Unchecked: applied as a layer effect, still editable later.
- Checked: merged into the layer, no longer editable.
- Set the parameters and click
OK.
When successful, the fx icon appears next to the layer name.
The Layer Effects Dialog
Click the fx icon next to a layer name to open the Layer Effects dialog:
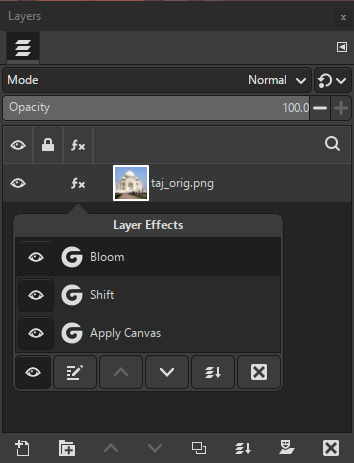
From this dialog you can:
- Select an effect: click a row in the list to select it. Only one effect can be selected at a time.
- Edit an effect: with an effect selected, click Edit to reopen the filter dialog and change parameters.
- Remove an effect: with an effect selected, click Remove.
- Reorder effects: click Up or Down to change the order in the stack.
- Toggle visibility: click the eye icon next to an effect to show or hide it; the bottom button toggles all effects.
- Merge all effects: click Merge Down to merge every layer effect into the layer itself. This is irreversible unless undone.
Order Matters
Layer Effects are rendered from bottom to top. The output of a lower effect becomes the input of the effect above it, so changing the order can significantly change the final appearance.
For example, applying blur before a color adjustment usually gives a different result than adjusting color first and then blurring.
Merging and Auxiliary Images
Some filters require an additional “auxiliary image,” such as a bump map or mask. For these filters, the Merge Filter checkbox is checked and disabled, so they cannot currently be used as layer effects.
Undo and Persistence
- Adding, removing, and modifying layer effects can all be undone.
- Layer Effects are saved with the XCF file.
- When exporting to PNG, JPEG, or even PSD, layer effects are merged into pixels.
Performance Tips
A large number of layer effects can slow down editing. If the image becomes sluggish, consider:
- Merging some effects into the layer;
- Hiding effects that are not currently needed;
- Lowering the preview resolution or disabling live updates.
Conclusion
Layer Effects give Bree Photo powerful non-destructive editing capabilities. Used wisely, they let you experiment with many visual styles while keeping the original image intact.
Source & License
This tutorial is adapted from the GIMP Documentation Team’s Layer Effects.
This document is licensed under the GNU Free Documentation License, Version 1.2 or later; with no Invariant Sections, no Front-Cover Texts, and no Back-Cover Texts.