
快速上手Quick Start
三条路:接扫描仪、导入图片、或者两者都用。Three routes: a scanner, imported images, or both.
- 装好应用后直接打开。如果你还没有连接扫描仪,应用会提示「未检测到扫描仪」,点「添加扫描仪」可以去 Windows 里添加设备;如果你只是想把手机拍的照片或已有的图片做成 PDF,直接关掉这个提示就行。Open the app. If no scanner is connected it warns you and offers “Add Scanner”, which opens the Windows device settings. If you only want to turn photos or existing images into a PDF, just dismiss the warning.
- 要扫描纸件:先连接扫描仪(见 添加扫描仪),然后按面板底部的绿色「扫描」。To scan paper: connect a scanner first (see Adding a Scanner), then press the green “Scan” at the bottom of the panel.
- 不扫描纸件:直接把图片或 PDF 拖进窗口,或者点「导入图片」(见 导入图片)。Otherwise: drag images or PDFs into the window, or click “Import images” (see Importing Images).
- 在画布上整理页面(旋转、删除、拖动排序、裁剪),最后点右上角的「保存」导出(见 导出)。Tidy the pages on the canvas (rotate, delete, drag to reorder, crop), then click “Save” in the top right to export (see Export).
| 来源Source | 怎么进来How | 需要扫描仪Needs a scanner |
|---|---|---|
| 扫描仪Scanner | 右侧面板底部「扫描」“Scan” at the bottom of the right panel | 需要Yes |
| 图片 / PDF 文件Image / PDF files | 「导入图片」或直接拖进窗口“Import images” or drag them in | 不需要No |
界面概览Interface Overview
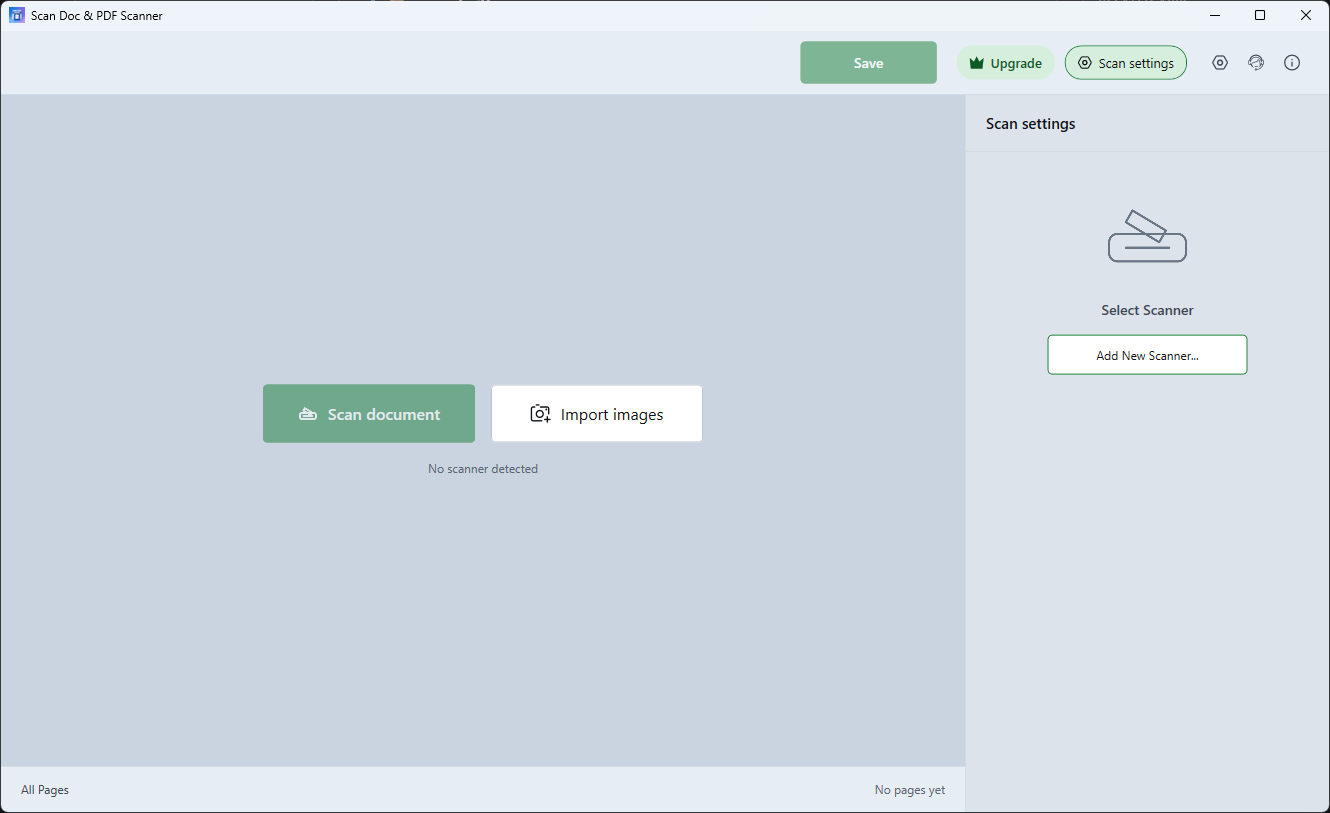
四个区域,从上到下、从左到右看一眼就知道该点哪里。Four areas — you can tell where to click at a glance.
- 顶栏:右边的「保存」是导出入口;「升级」是购买;最右边三个圆形图标依次是 设置、反馈、关于。Top bar: “Save” exports, “Upgrade” opens the purchase window, and the three round icons on the right are Settings, Feedback and About.
- 画布(左侧大片区域):页面缩略图都在这里。空的时候会给你两个大按钮——「扫描文档」与「导入图片」。Canvas (the large area on the left): every page thumbnail lives here. While it is empty you get two big buttons — “Scan document” and “Import images”.
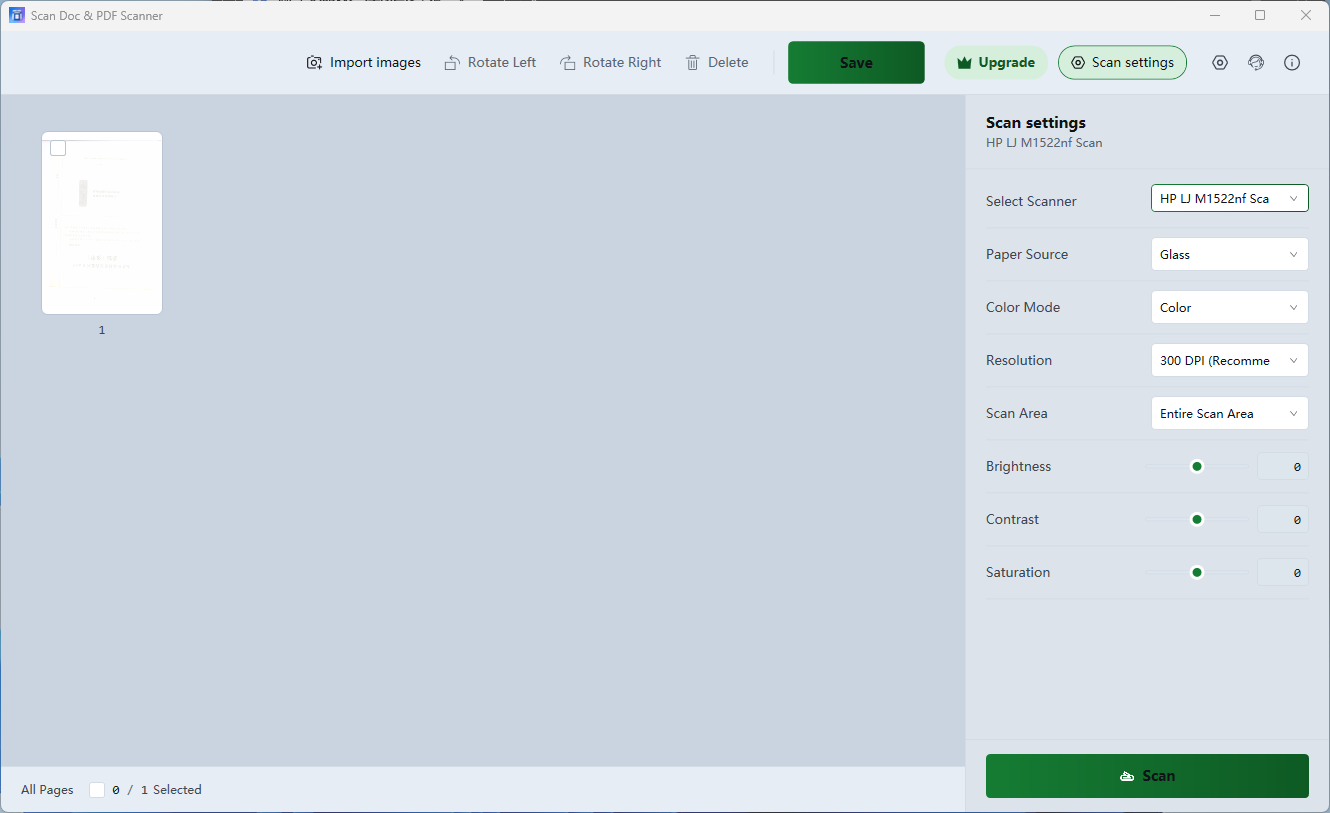
- 右侧面板:扫描仪设置(选择扫描仪、纸张来源、色彩模式、分辨率、扫描区域、亮度/对比度/饱和度)与底部绿色的「扫描」按钮。没有扫描仪时这里显示的是引导空态。Right panel: scanner settings (scanner, paper source, colour mode, resolution, scan area, brightness/contrast/saturation) plus the green “Scan” button. Without a scanner this area shows an empty state instead.
- 底部状态条:左边是「全部页面」,右边显示已选中的张数。Status bar: “All Pages” on the left and the number of selected pages on the right.
添加扫描仪Adding a Scanner
只要系统里能认出设备,应用就会自动把它列出来。As soon as Windows can see the device, the app lists it automatically.
- 先让 Windows 认识它:接好 USB 线并开机(网络扫描仪要确保和电脑在同一个网络),装好厂商驱动。诊断顺序:电源 → 线缆 / 网络 → 驱动。Let Windows see it first: connect the USB cable and power the device on (a network scanner must be on the same network), and install the vendor driver. Check in this order: power → cable/network → driver.
- 在应用里点「添加新扫描仪…」(右侧面板空态里,或者启动时那个「未检测到扫描仪」提示里都有)。它会打开 Windows 的打印机和扫描仪设置,在那里添加设备。Click “Add New Scanner…” in the app — it is in the right panel's empty state and in the “no scanner detected” notice. That opens the Windows Printers & scanners settings, where you add the device.
- 回到应用:只要窗口被激活(点一下应用窗口即可),它就会重新枚举设备。识别到之后,右侧面板的「选择扫描仪」会自动选中第一台,设置面板也就出现了。Come back to the app and activate its window (just click it): it re-enumerates devices. Once one is found, “Select Scanner” picks the first device automatically and the settings panel appears.
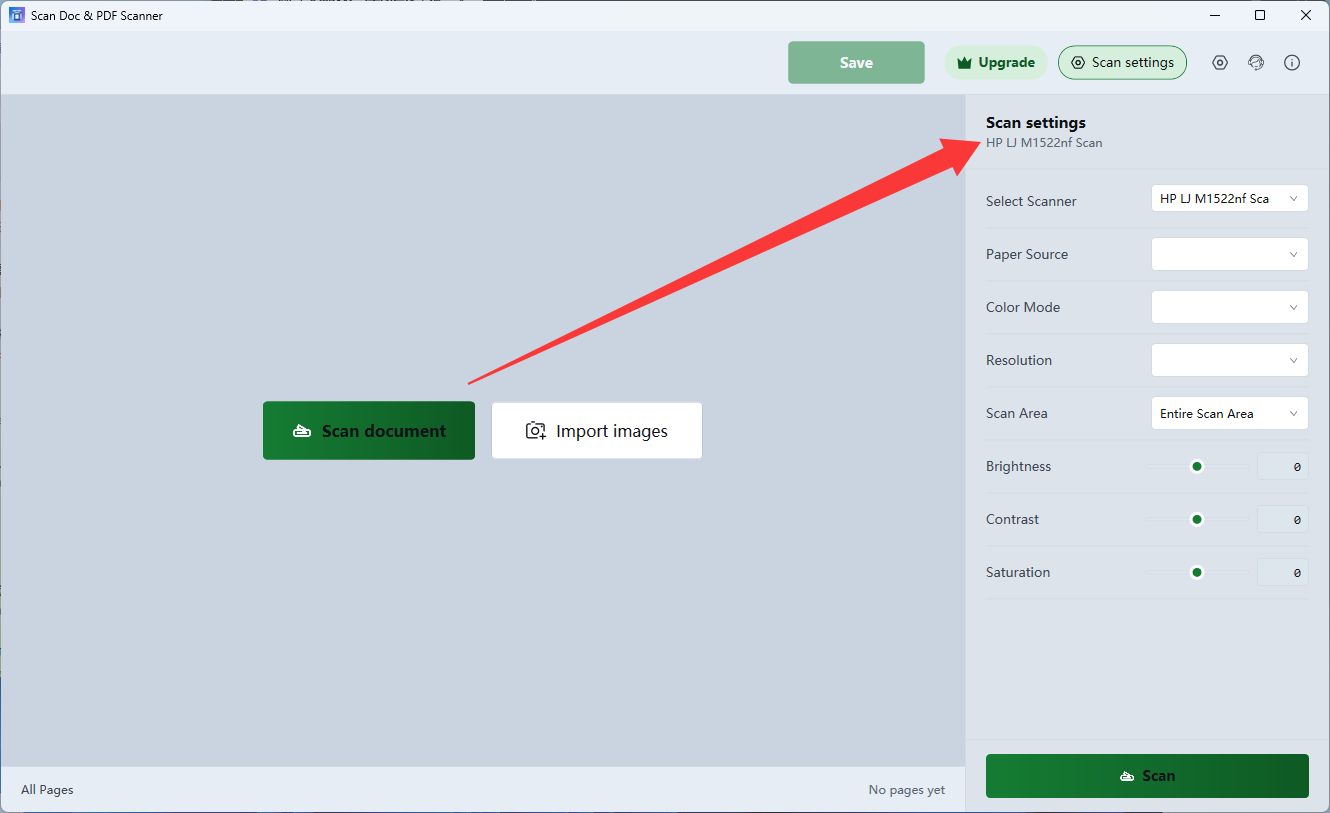
只有当有一台扫描仪被选中时才会出现。此时面板顶部会显示「扫描设置」,标题下方还有一行小字显示当前设备名,底部则出现绿色的「扫描」按钮。
Only while a scanner is selected. The panel then shows “Scan settings” with the current device name underneath, and the green “Scan” button appears at the bottom.
| 选项Option | 作用What it does |
|---|---|
| 选择扫描仪Select Scanner | 在这台电脑上被识别到的设备之间切换Switches between devices visible to this PC |
| 纸张来源Paper Source | 平板玻璃 / 自动送稿器(ADF)等;送稿器适合一次扫多页Flatbed / document feeder (ADF) and similar; the feeder suits multi-page batches |
| 色彩模式Color Mode | 彩色 / 灰度。纯文字稿选灰度,文件更小、更清楚Colour / greyscale. For text-only pages greyscale gives smaller, crisper files |
| 分辨率Resolution | 可选范围 75 ~ 1200 DPI,常用 200 / 300 / 600。300 DPI 是扫描文档的通用选择;越高越清晰、也越慢越大75 – 1200 DPI, with 200 / 300 / 600 in common use. 300 DPI suits most documents; higher is sharper but slower and larger |
| 扫描区域Scan Area | 「整个扫描区域」,或按 Letter / A4 / A5 / B5 / 4×6 等具体纸张尺寸“Entire scan area”, or a specific paper size such as Letter / A4 / A5 / B5 / 4×6 |
| 亮度 / 对比度 / 饱和度Brightness / Contrast / Saturation | 扫描时的图像微调,中间的圆点即为默认值,可直接拖回中间还原Fine-tuning for the scan; the dot in the middle is the default value — drag it back to reset |
扫描文档Scanning Documents
选好设备与参数,一次一张或一次一叠。Pick the device and settings, then feed it one sheet or a whole stack.
- 有扫描仪时:右侧面板底部的绿色「扫描」按钮。With a scanner: the green “Scan” button at the bottom of the right panel.
- 画布为空且已识别到设备时:画布中间那颗「扫描文档」按钮,和上面那颗是同一个动作。On an empty canvas with a device present: the “Scan document” button in the middle does the same thing.
- 送稿器(ADF)放好几页后按一次扫描,会依次把每一页都扫进来。With an ADF, load the sheets and scan once — every page is captured in order.
扫描时右侧面板会显示一个加载指示;导入与导出才会弹出带百分比和「取消」的进度提示,点那个「取消」会真的中止当前操作。应用没有单独的「停止扫描」按钮——扫描要中断,请在设备上按取消键。
While scanning, the right panel shows a loading indicator. The progress prompt with a percentage and “Cancel” appears for importing and exporting, and clicking that “Cancel” really does abort the operation. There is no separate “Stop scanning” button — to interrupt a scan, press cancel on the device itself.
按顺序追加到左侧画布,每张缩略图下方有页码,底部状态条会更新总张数。之后就能像处理导入的图片一样旋转、删除、拖动排序、裁剪与导出。
They are appended to the canvas on the left, each thumbnail numbered, and the total in the status bar updates. From there you can rotate, delete, drag to reorder, crop and export them exactly like imported images.
导入图片Importing Images
没有扫描仪也不影响使用——把照片或已有图片做成 PDF 是同样的流程。No scanner is required: turning photos or existing images into a PDF follows the same flow.
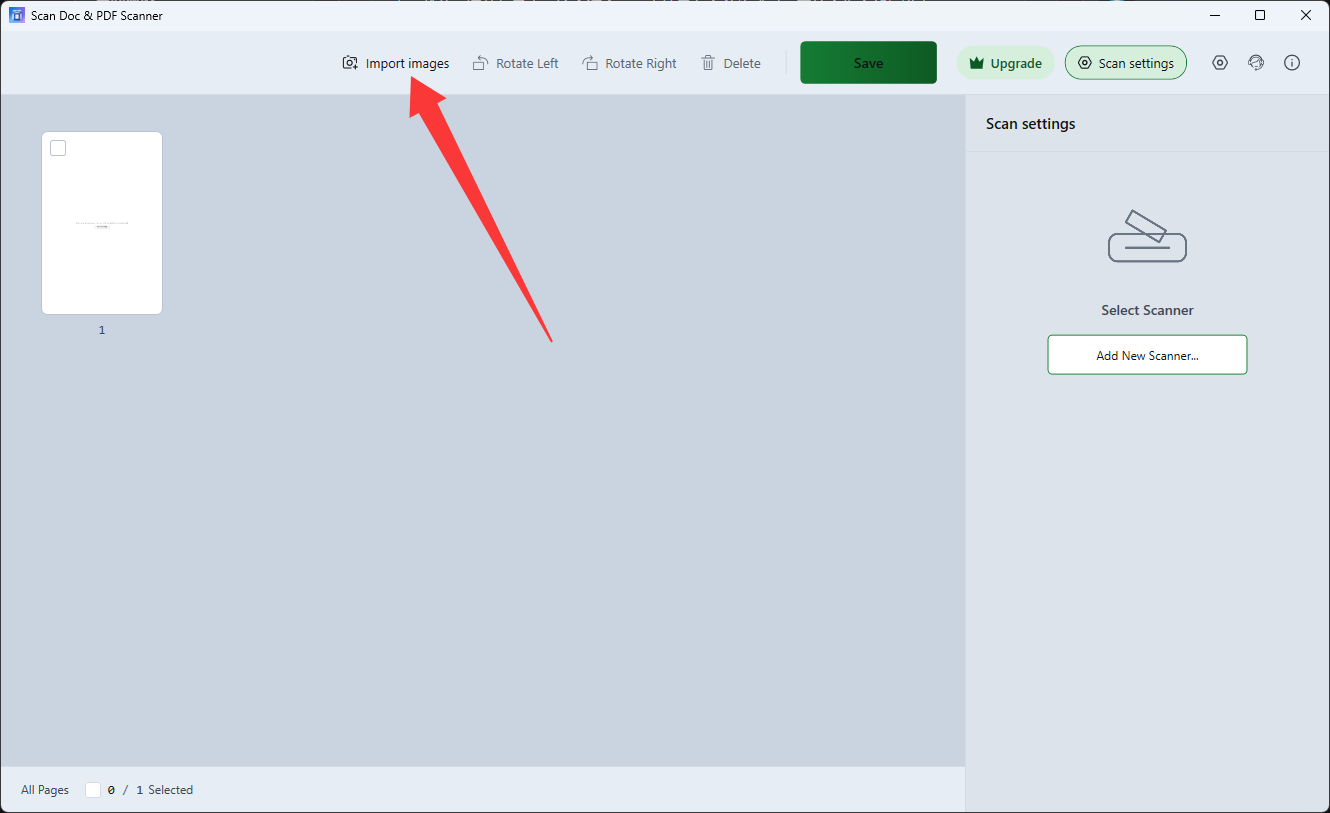
- 顶栏的「导入图片」按钮(有页面之后它才出现)。The “Import images” button in the top bar (it appears once there are pages).
- 画布空的时候,中间两颗大按钮里右边那颗「导入图片」。On an empty canvas, the right-hand one of the two big buttons.
- 直接把文件拖进应用窗口——最快的方式,可以一次拖多个。Drag files straight into the window — the fastest route, and you can drop several at once.
导入的页面会追加到画布末尾,之后与扫描出来的页面完全一样:可旋转、删除、拖动排序、裁剪、调整与导出。注意顺序:一次性导入多种格式时,图片会先全部加进来,PDF 一律排在后面。
Imported pages are appended to the canvas and behave exactly like scanned ones: rotate, delete, drag to reorder, crop, adjust and export. Note the order: when you import several formats at once, all images are added first and PDFs always come after them.
旋转、删除与排序Rotate, Delete, Reorder
画布上的一切整理动作都先「选中页面」再操作。Every tidying action works on the pages you have selected.
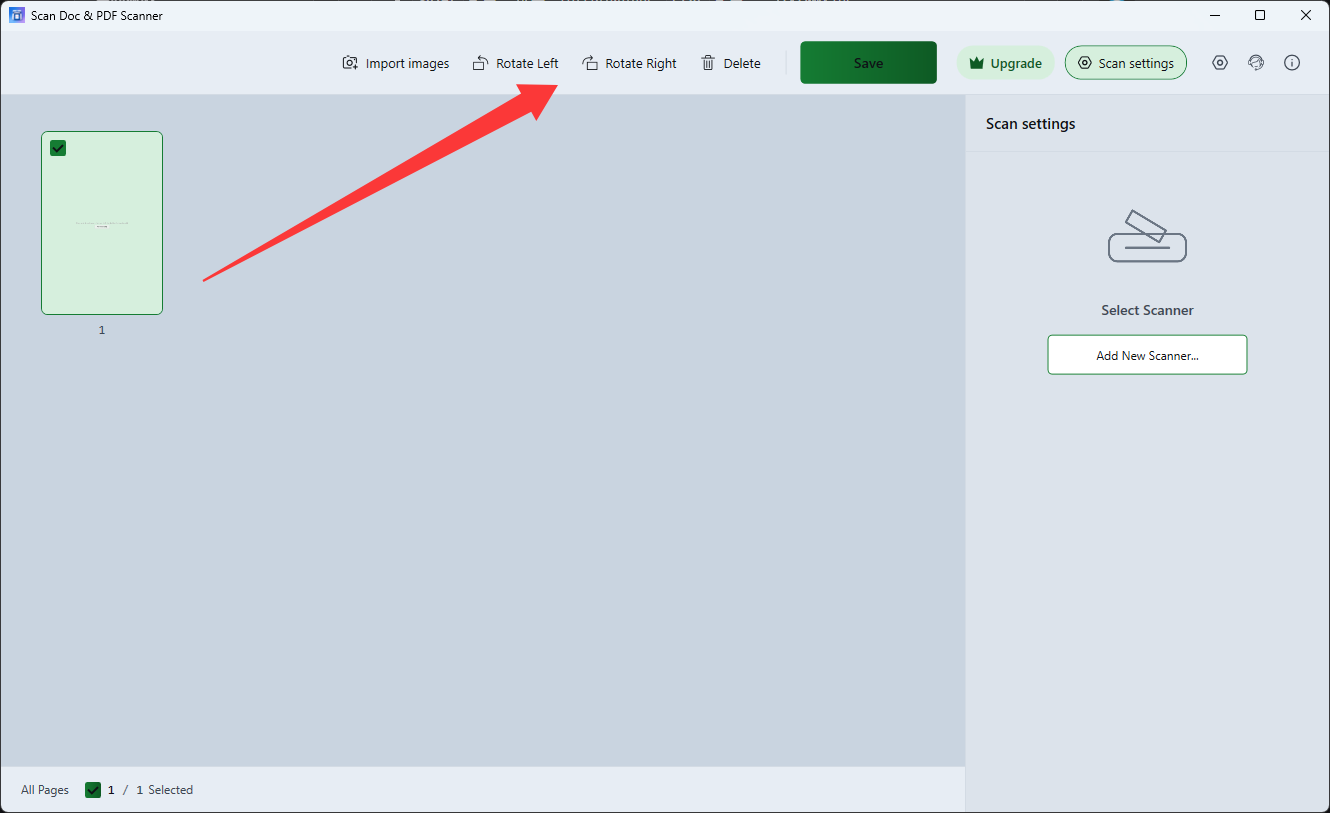
- 点一下缩略图 = 选中它(再点一下取消)。Click a thumbnail to select it (click again to deselect).
- Shift + 点 = 选中一段连续的页面;Ctrl + 点 = 一个个挑着选。Shift + click selects a run of pages; Ctrl + click picks them one by one.
- Ctrl+A 全选,Esc 取消所有选择。底部状态条会显示当前选中了几张。Ctrl+A selects everything, Esc clears the selection. The status bar shows how many are selected.
| 动作Action | 怎么做How |
|---|---|
| 向左 / 向右旋转Rotate left / right | 先在画布上选中页面,再点顶栏的「向左旋转」或「向右旋转」Select pages, then click “Rotate Left” / “Rotate Right” in the top bar |
| 删除页面Delete pages | 选中后点顶栏「删除」,会先弹一个确认框Select and click “Delete”; a confirmation appears first |
| 调整页面顺序Reorder pages | 直接拖动缩略图到目标位置Drag a thumbnail to where you want it |
| 缩略图太小 / 太大Thumbnails too small / large | 按住 Ctrl 滚动鼠标滚轮缩放Hold Ctrl and roll the mouse wheel |
预览与裁剪Preview & Crop
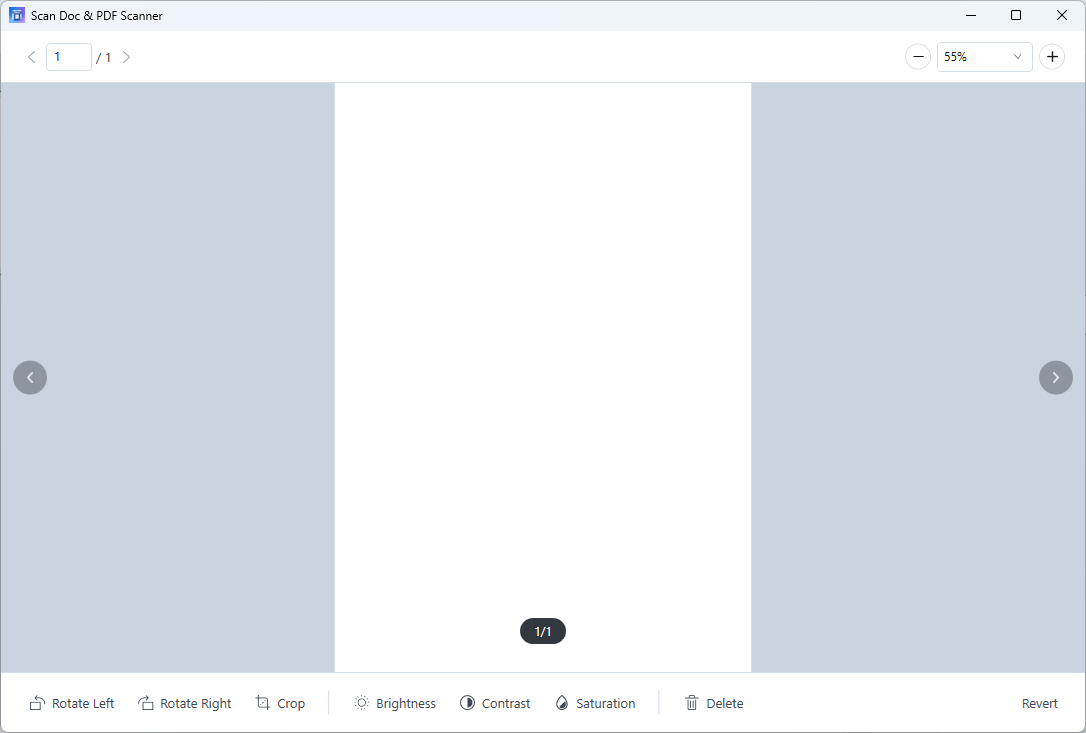
放大看细节、裁剪掉多余的边缘、单页微调,都在这个窗口里。Zoom in, crop the edges away and fine-tune a single page — all in this window.
在画布上双击任意一张缩略图。这是进入单页预览的唯一入口(顶栏与导出窗里都没有),记住了就不难找。
Double-click any thumbnail on the canvas. That is the only way into the single-page preview (it is not in the top bar or the export dialog) — once you know it, it is easy to find.
- 双击缩略图进入预览。Double-click a thumbnail to open the preview.
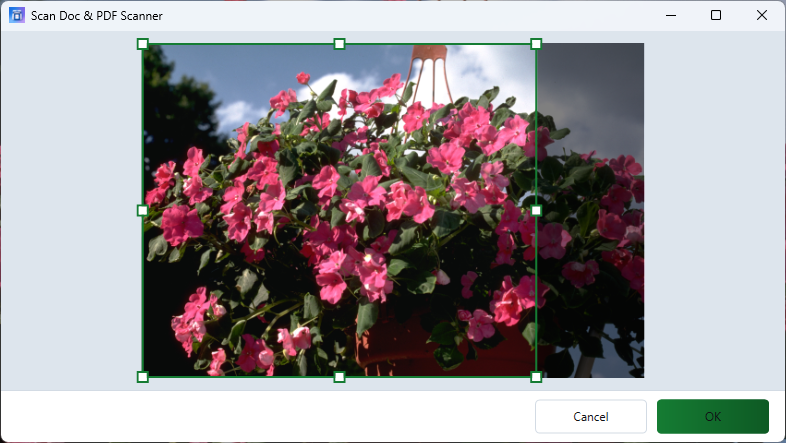
- 点预览窗底部的「裁剪」。Click “Crop” at the bottom of the preview.
- 在裁剪窗里拖动方框框住要保留的部分,点「确定」;「取消」则放弃本次裁剪。In the crop window drag the frame around the part to keep and click OK — Cancel discards it.
- 缩放查看(下拉或滚轮)、翻页Zoom (drop-down or wheel) and page through
- 旋转、删除当前页Rotate or delete the current page
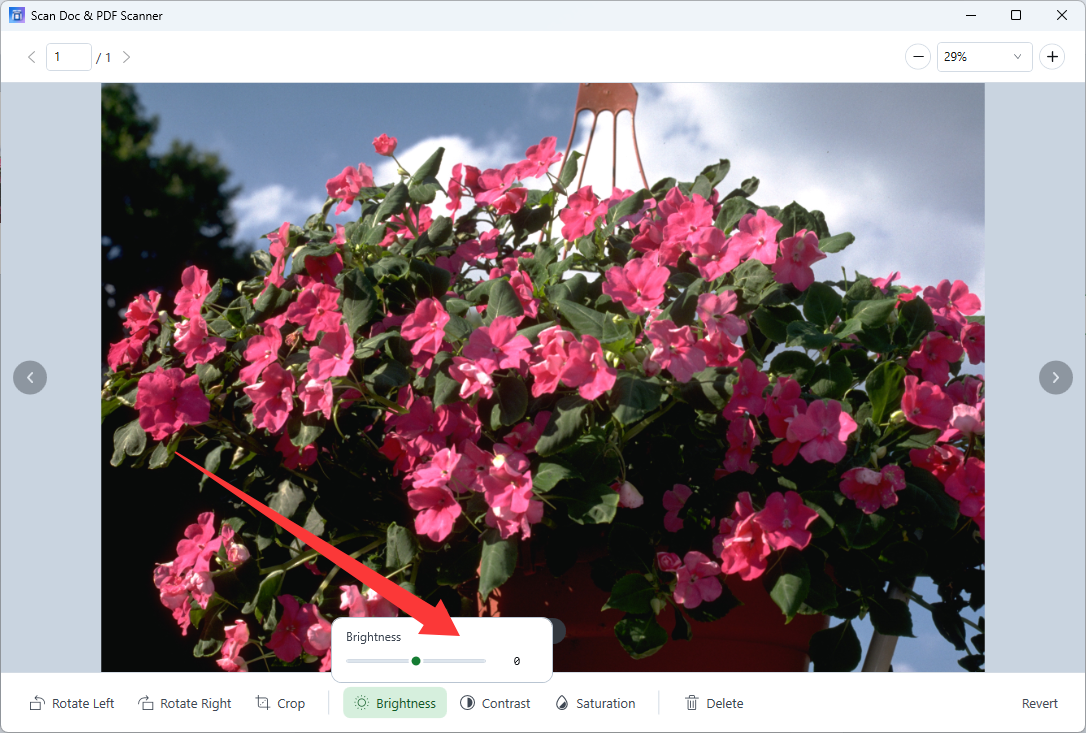
- 亮度 / 对比度 / 饱和度微调,以及「还原」一键回到原图Brightness / contrast / saturation, plus “Revert” to go back to the original
亮度 / 对比度 / 饱和度Brightness / Contrast / Saturation
同一组滑杆出现在两个地方,作用范围不一样。The same three sliders appear in two places, with different scopes.
| 位置Where | 作用Effect |
|---|---|
| 右侧扫描面板(需扫描仪)Right scan panel (needs a scanner) | 影响之后扫进来的画面,是"扫描时就调好"Applies to upcoming scans — set it before scanning |
| 单页预览窗Single-page preview | 只改当前这一页,对已经导入或扫好的页面生效Affects this page only, and works on imported or already-scanned pages |
中间那个圆点是默认值,往左右拖动即可调整;调过头了就用预览窗的「还原」回到原始图像。
The dot in the middle is the default; drag left or right to adjust. If it goes too far, use “Revert” in the preview to return to the original image.
导出 PDF / JPEG / PNGExport to PDF / JPEG / PNG
整理满意之后,最后一步就是导出。Once the pages look right, the last step is exporting.
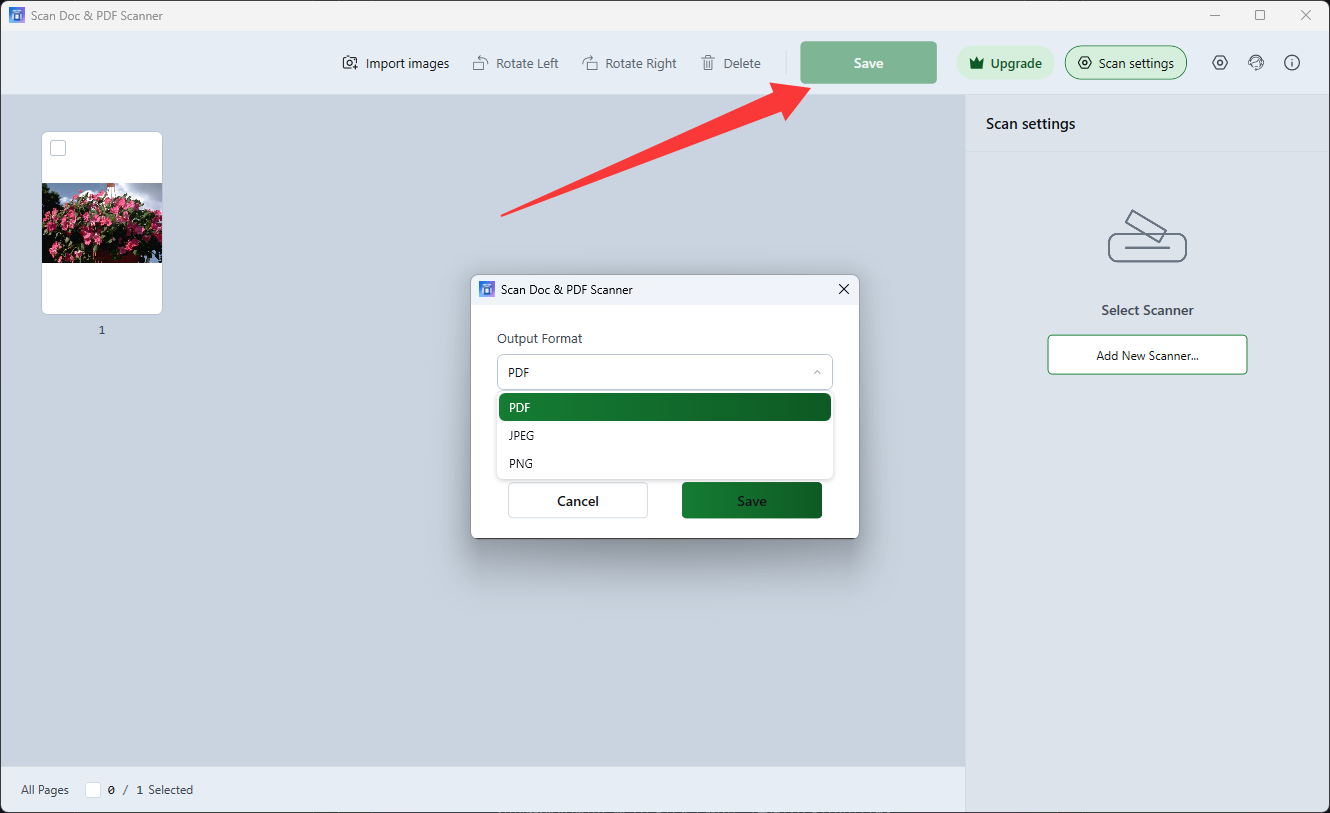
- 点顶栏的「保存」。Click “Save” in the top bar.
- 在导出对话框里选输出格式:PDF、JPEG 或 PNG。Choose the output format: PDF, JPEG or PNG.
- 选范围:导出全部页面,或者只导出选中的页面(先在画布上选好)。Choose the range: all pages, or only the selected pages (select them on the canvas first).
- 在保存对话框里确认文件名与目录,点「保存」。Confirm the file name and folder in the save dialog and click Save.
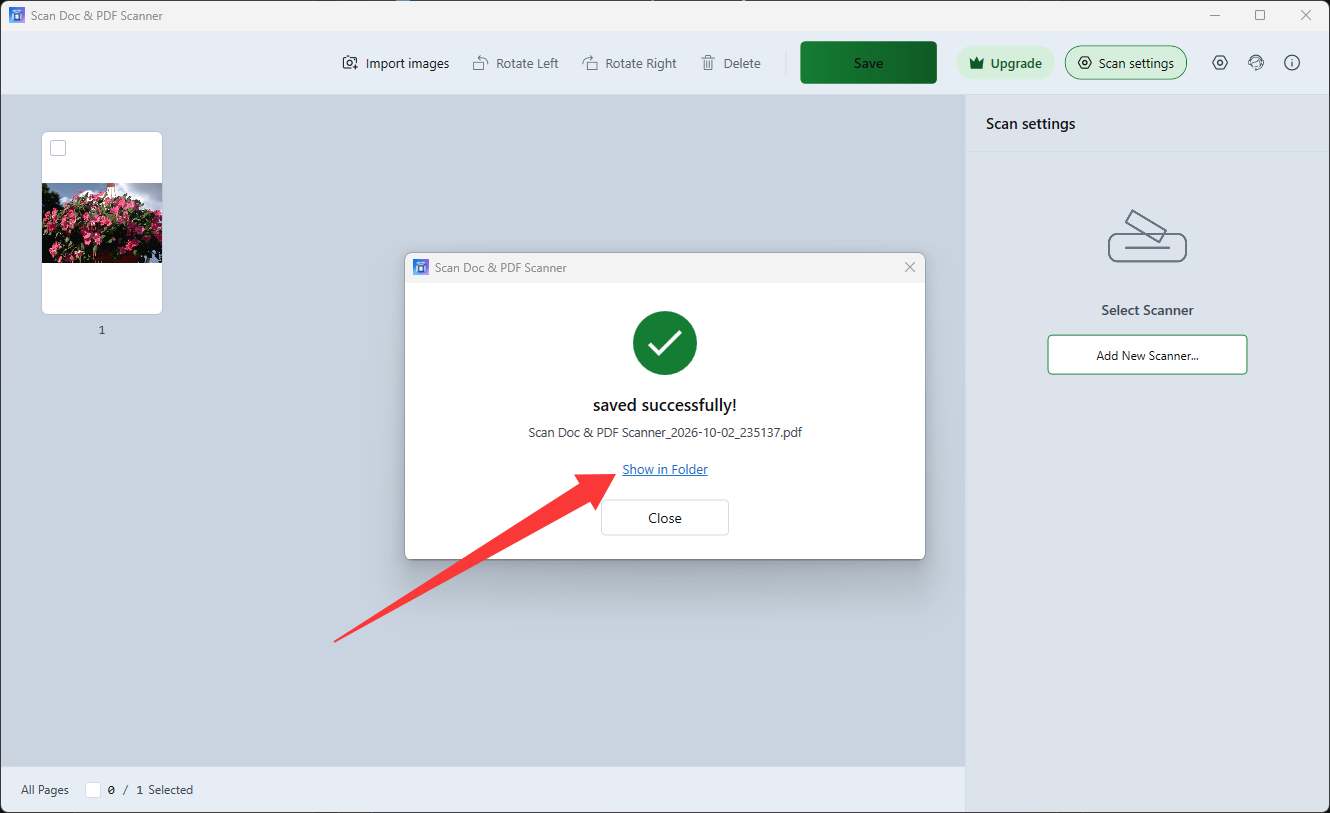
- 导出完成后会有一个成功提示,点「在文件夹中显示」可以直接打开所在目录。A success prompt appears when it finishes — click “Show in folder” to open the destination.
Scan Doc & PDF Scanner 文件夹;在保存对话框里可以改成任何位置,下次会记住你上次选的地方。
The default folder is Scan Doc & PDF Scanner inside your Documents; you can pick anywhere in the save dialog, and the last choice is remembered.
说明你选的目标文件名正被别的程序占用(最常见的是上一版 PDF 还开在阅读器里)。关掉那个程序,或者换一个文件名,再导出一次即可。
The target file name is locked by another program — most often the previous PDF is still open in a reader. Close it, or pick another name, and export again.
主题与语言Theme & Language
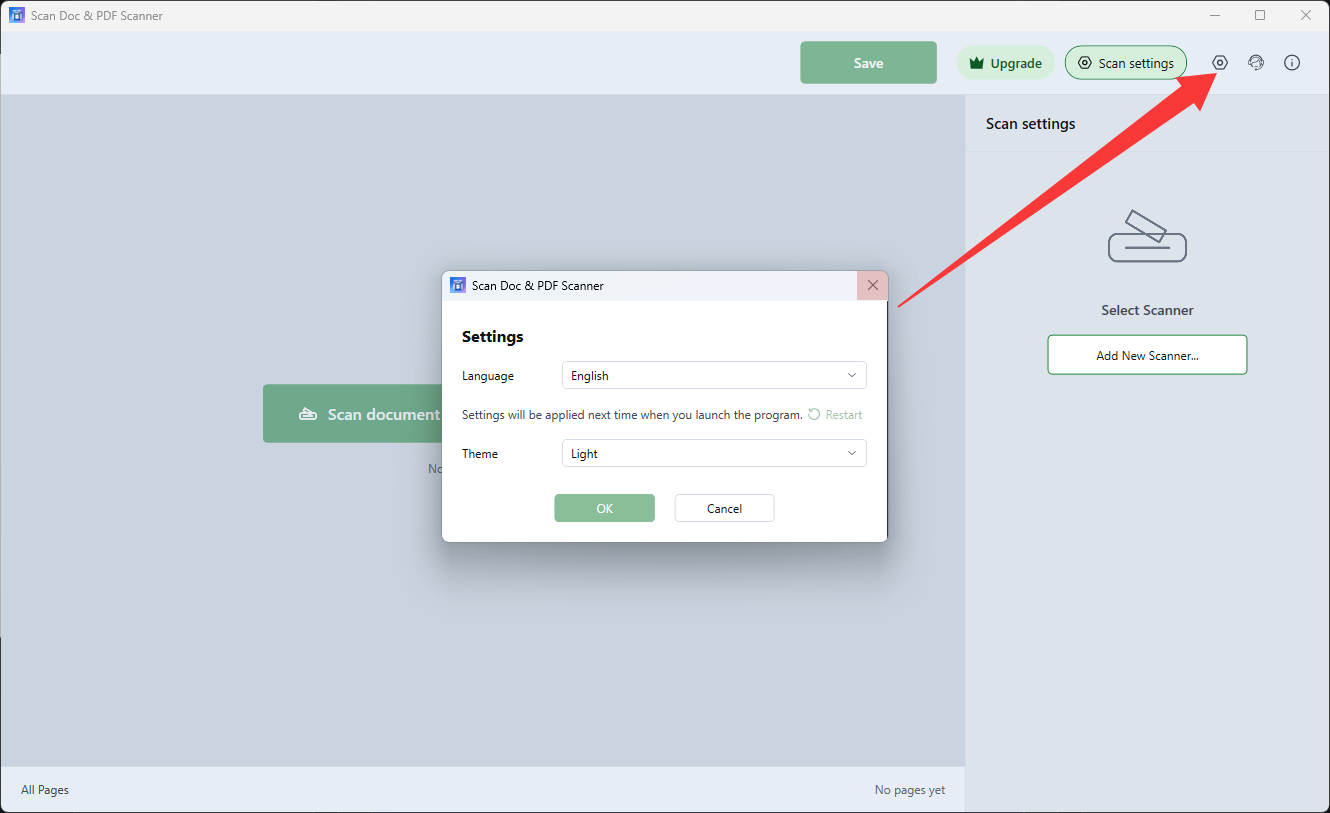
点顶栏最右边那颗齿轮图标打开设置。Click the gear icon at the far right of the top bar.
设置 → 主题 → 选「浅色」「深色」或「跟随系统」。选中即生效,不需要重启;「跟随系统」会跟着 Windows 的深色/浅色设置自动变化,你在系统里切换时应用会立刻跟上。
Settings → Theme → pick Light, Dark or Follow system. It applies immediately — no restart. “Follow system” tracks the Windows light/dark setting and updates the moment you change it.
设置 → 语言 → 从 11 种界面语言里选一个,然后点设置窗里的「重启」让它生效(只有所选语言与当前不同时「重启」才可点)。语言切换需要重启应用,主题不需要。
Settings → Language, pick one of the 11 interface languages, then click “Restart” in the settings window (it is only enabled when the choice differs from the current language). Changing the language needs a restart; changing the theme does not.
购买与升级Buying & Upgrading
免费版已经能完成完整流程,高级版解除次数与分辨率上的限制。The free version covers the whole flow; the premium version lifts the limits on volume and resolution.
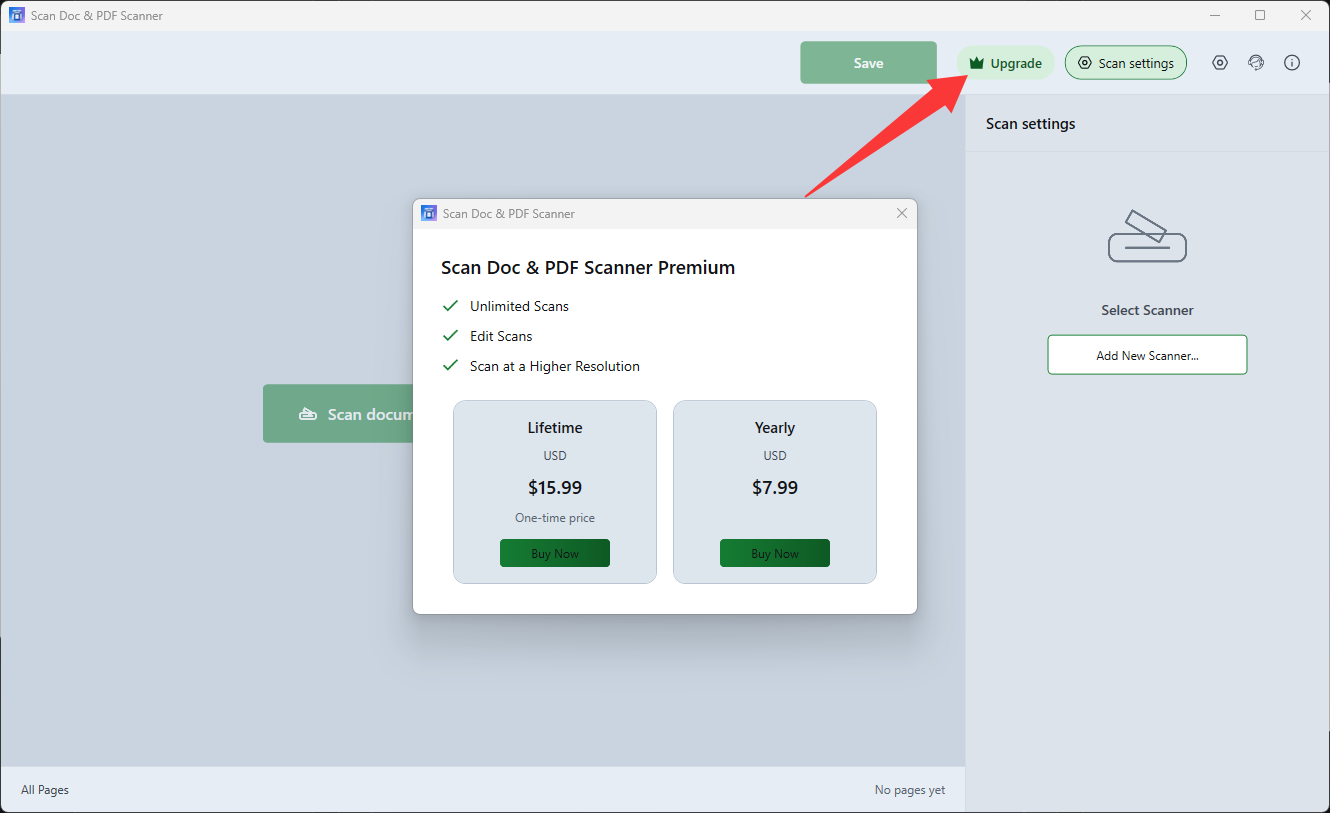
点顶栏的「升级」即可看到内购窗,里面列出的三项权益是:无限次扫描、编辑扫描件、以更高分辨率扫描。可选永久或按年两种方式,价格以内购窗显示的为准。
Click “Upgrade” in the top bar. The window lists three benefits: unlimited scans, editing scanned pages and scanning at a higher resolution. It can be bought as a lifetime or a yearly licence; the price shown in the window is the one that applies.
那是正常的:应用检测到当前账号已经拥有高级版,就不会再让你重复购买,而是直接告诉你已经是高级版了。
That is expected: the app sees that this account already owns premium, so instead of selling it again it simply confirms the upgrade is already in place.
还有两种:① 应用启动时会自动提示一次(每天最多 3 次,不会反复打扰);② 当你导出多页、或选择导出 PDF 时,如果还没解锁,也会先弹出来问一下。不想买直接关掉即可,导出流程会照常继续。
Two more cases: ① the app prompts once on startup (at most three times a day, so it never nags); ② exporting several pages, or choosing PDF, raises it first while the feature is locked. Closing it without buying is fine — the export continues as usual.
常见问题FAQ
用户问得最多的几个问题。The questions users ask most often.
能。导入图片或 PDF、整理页面、裁剪、调整、导出 PDF —— 这些都不需要扫描仪。只有「扫描」和右侧那组扫描参数需要真实设备。
Yes. Importing images or PDFs, tidying pages, cropping, adjusting and exporting a PDF all work without a scanner. Only “Scan” and the scan settings on the right need real hardware.
按这个顺序排查:① 设备开机了吗;② USB 线 / 网络连接是否正常(网络扫描仪要和电脑在同一网络);③ 厂商驱动是否装好(装好后在 Windows 的「扫描仪和照相机」里应能看到它);④ 回到应用点一下窗口让它重新枚举,或者用面板里的「添加新扫描仪…」。详见 添加扫描仪。
Check in this order: ① is the device powered on; ② is the USB cable or network link fine (a network scanner must be on the same network); ③ is the vendor driver installed (Windows “Scanners and Cameras” should then list it); ④ click the app window to re-enumerate, or use “Add New Scanner…”. See Adding a Scanner.
不会。页面处理、裁剪、调整与导出全部在你本机完成,应用不需要联网也能用完整流程。
No. Processing, cropping, adjusting and exporting all happen on your machine, and the full flow works without an internet connection.
导出成功提示里点「在文件夹中显示」最直接。默认位置是「文档」下的 Scan Doc & PDF Scanner。也可以在导出时自己指定目录,应用会记住。
Click “Show in folder” in the success prompt — that is the quickest route. By default files land in Scan Doc & PDF Scanner under Documents, and any folder you pick is remembered.
反馈与支持Feedback & Support
顶栏右边三个圆形图标:设置、反馈、关于。The three round icons on the right of the top bar: Settings, Feedback, About.
点顶栏的反馈图标,会打开你系统默认的邮件程序,收件人、主题、正文都已经填好:正文上方留给你写问题描述和复现步骤,下面自动附上一段环境信息(应用版本、Windows 版本、界面语言等),这样作者不用再问一遍。附上相关截图会更快定位问题。
Click the Feedback icon: your default mail app opens with the recipient, subject and body already filled in. The top of the body is for your description and steps to reproduce, and a diagnostics block (app version, Windows version, UI language) is appended automatically so nothing has to be asked twice. A screenshot speeds things up further.
- 教程:打开在线教程页。Tutorial: opens the online tutorial.
- 评价应用:直接打开 Microsoft Store 的评价页面;你的评分对这个应用帮助很大。Rate app: opens the Microsoft Store review page — a rating helps a lot.
- 赞助支持:作者的支持页面(Ko-fi)。Support us: the developer's support page (Ko-fi).
- 隐私政策:说明应用如何处理数据。Privacy policy: how the app handles your data.
只要这个应用被用过(本次启动或者之前扫描过、导入过、导出过任一),关闭时就会问一次「喜欢这个应用吗」。如果画布上还有页面,会先问一次「你有未保存的更改,确定要退出吗」,然后再弹好评窗。点「给我们评分」跳转 Microsoft Store 评价页;不想再看到它,勾上「不再显示」再关掉即可。点「取消」= 不评价,应用照常关闭。
Once the app has been used at all — in this session or an earlier one — closing it asks whether you like it. If pages are still on the canvas, it first asks “You have unsaved changes, quit anyway?” and only then shows the rating prompt. “Rate us” opens the Microsoft Store review page; tick “Don't show this again” to stop it for good. “Cancel” means no rating, and the app closes as usual.