

快速入门Quick Start
如何快速拼出一张图?
How do I create a collage quickly?
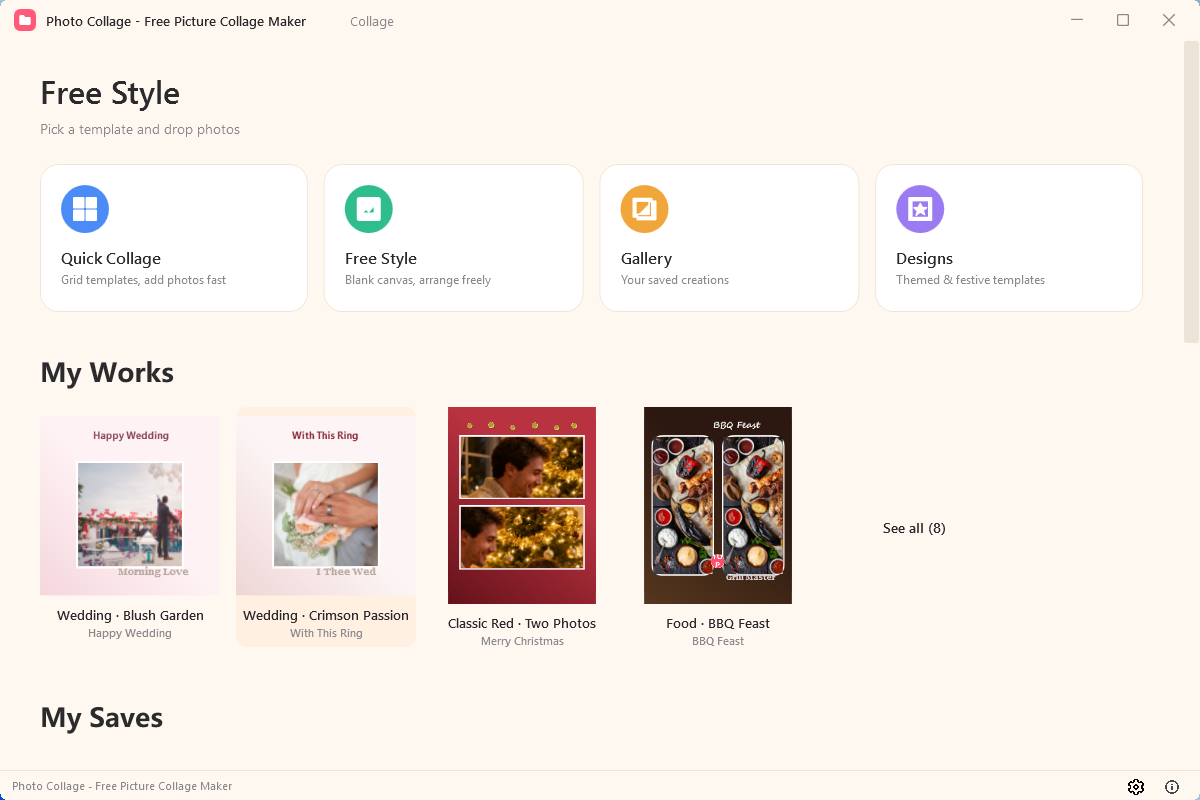
- 启动应用,进入首页(入口卡片:快速拼图 / 自由排版 / 画廊 / 设计模板)Launch the app and land on the Home screen (entry cards: Quick Collage / Free Style / Gallery / Designs)
- 点击「快速拼图」卡片(“热门模板,快速拼图”)进入拼图编辑器Click the "Quick Collage" card ("Grid templates, add photos fast") to open the collage editor
- 把照片拖进画布,或点顶栏「添加图片」多选文件,照片会自动填入格子Drag photos onto the canvas or click "Add Image" in the top bar to multi-select; photos auto-fill the grid slots
- 用左侧工具微调:模板 / 比例 / 背景 / 滤镜 / 文字 / 贴纸Fine-tune with the left rail tools: Layout / Ratio / Background / Filter / Text / Sticker
- 点右上角「保存图片」,选择 PNG/JPG 与分辨率(1x/2x/4x)完成保存Press "Save" in the top-right corner, choose PNG/JPG and resolution (1x/2x/4x) to finish
Photo Collage 支持哪些功能?
What features does Photo Collage support?
| 功能 | Feature | 说明 | Description |
|---|---|---|---|
| 快速拼图 | Quick Collage | 19 种网格模板,拖入照片一键成图 | 19 grid templates; drop photos in and done in seconds |
| 自由排版 | Free Style | 空白画布自由摆放照片、文字与贴纸 | Blank canvas to arrange photos, text and stickers freely |
| 设计模板 | Design Templates | 1,300+ 节日/主题现成设计 | 1,300+ festive and themed ready-made designs |
| 滤镜 / 文字 / 贴纸 | Filters / Text / Stickers | 30+ 滤镜、艺术字与 8 类贴纸 | 30+ filters, art text and 8 sticker sets |
| 高清导出 | HD Export | PNG/JPG,最高 4x 分辨率导出 | PNG/JPG output up to 4x resolution |
界面概览Interface Overview
应用界面由哪些部分组成?
What areas make up the interface?
- 首页(主界面)Home hub — 入口卡片(快速拼图/自由排版/画廊/设计模板)+ 我的作品 + 我的保存 + 分类 + 热门entry cards (Quick Collage / Free Style / Gallery / Designs) plus My Works, My Saves, Categories and Popular sections
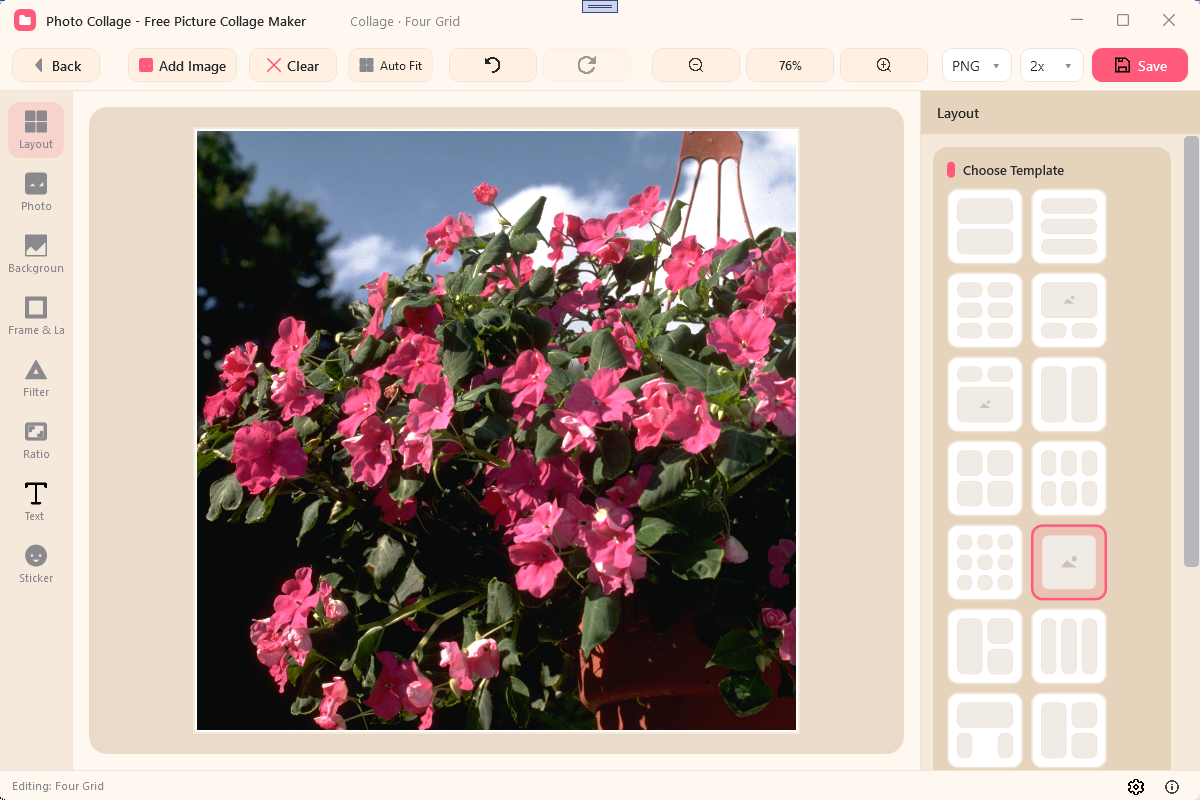
- 拼图编辑器Collage editor — 顶栏(返回/添加图片/清空/撤销/重做/缩放/格式/保存)+ 左侧工具条 + 中间画布 + 右侧上下文面板top bar (Back / Add Image / Clear / Undo / Redo / zoom / format / Save), left tool rail, center canvas and right context panel
- 窗口右下角齿轮Gear icon (bottom-right) — 打开设置对话框(语言/主题/导出目录)opens the settings dialog (Language / Theme / Output Folder)
- 状态栏信息按钮Info icon (status bar) — 打开“关于”窗口(版本、教程/评分/捐赠/隐私链接)opens the About window (version and Tutorial / Rate / Donate / Privacy links)
制作网格拼图Make a Grid Collage
怎样把照片排进网格?
How do I place photos into the grid?
- 在首页点击「快速拼图」卡片,编辑器会先给出一个默认网格(如四宫格)Click "Quick Collage" on Home; the editor opens with a default grid (e.g. Four Grid)
- 添加照片:直接把图片文件拖进画布,或点击顶栏「添加图片」一次性选择多个文件(JPG/PNG/BMP/GIF/WebP)Add photos by dragging image files onto the canvas, or click "Add Image" and select several at once (JPG/PNG/BMP/GIF/WebP)
- 照片按顺序自动填入各个格子,多出的照片会被忽略Photos auto-fill the slots in order; extra photos are ignored
- 单格操作:点空格的「+」或已填格子可单独选图/换图;右键照片可选择「替换照片 / 删除照片 / 裁剪」Per-slot: click a "+" slot or a filled cell to choose/replace a single photo; right-click for "Replace Photo / Delete Photo / Crop"
- 想全部重来可点顶栏「清空」Use "Clear" on the top bar to start over
未放照片就点保存会提示“请先添加照片再保存”,放好照片即可正常保存。Saving without any photo shows "Add photos before saving" — just add photos first.
布局模板Layouts
支持哪些布局模板?
What layout templates are supported?

在编辑器中打开左侧「模板」工具可随时切换布局,共 19 种网格模板 + 自由拼贴:
Open the Layout tool on the left rail to switch layouts any time — 19 grid templates plus Free Style:
| 模板Layout | 照片数Photos | 场景Scene |
|---|---|---|
| 双图竖版Two Vertical | 2 | 小红书XHS |
| 三图竖版Three Vertical | 3 | 小红书XHS |
| 六格 2×3Six Grid 2×3 | 6 | 小红书XHS |
| 上大下二竖Big Top, Two Bottom | 3 | 小红书XHS |
| 上二下大竖Two Top, Big Bottom | 3 | 小红书XHS |
| 双图横版Two Horizontal | 2 | 朋友圈Moments |
| 四宫格Four Grid | 4 | 朋友圈Moments |
| 六格 3×2Six Grid 3×2 | 6 | 朋友圈Moments |
| 九宫格Nine Grid | 9 | 朋友圈Moments |
| 一张大片One Large | 1 | 朋友圈Moments |
| 主图+三格Main + Three | 3 | 朋友圈Moments |
| 三图横版Three Horizontal | 3 | 旅行Travel |
| 横幅+下二Banner + Two | 3 | 旅行Travel |
| 左大右三Left Large | 3 | 旅行Travel |
| 十六宫格Sixteen Grid | 16 | 旅行Travel |
| 四格海报Four Poster | 8 | 海报Poster |
| 上大下三Big Top, Three | 4 | 海报Poster |
| 左三右大Left Three, Big Right | 4 | 海报Poster |
| 日历格Calendar | 12 | 海报Poster |
| 自由拼贴Free Style | 不限Any | 自由Free |
模板模式下可直接拖动格子之间的分隔线,自由调整每格大小。In template mode you can drag the dividers between cells to resize each slot.
比例与边框Ratio & Frame
如何设置画布比例、边框与间距?
How do I set the canvas ratio, borders and spacing?
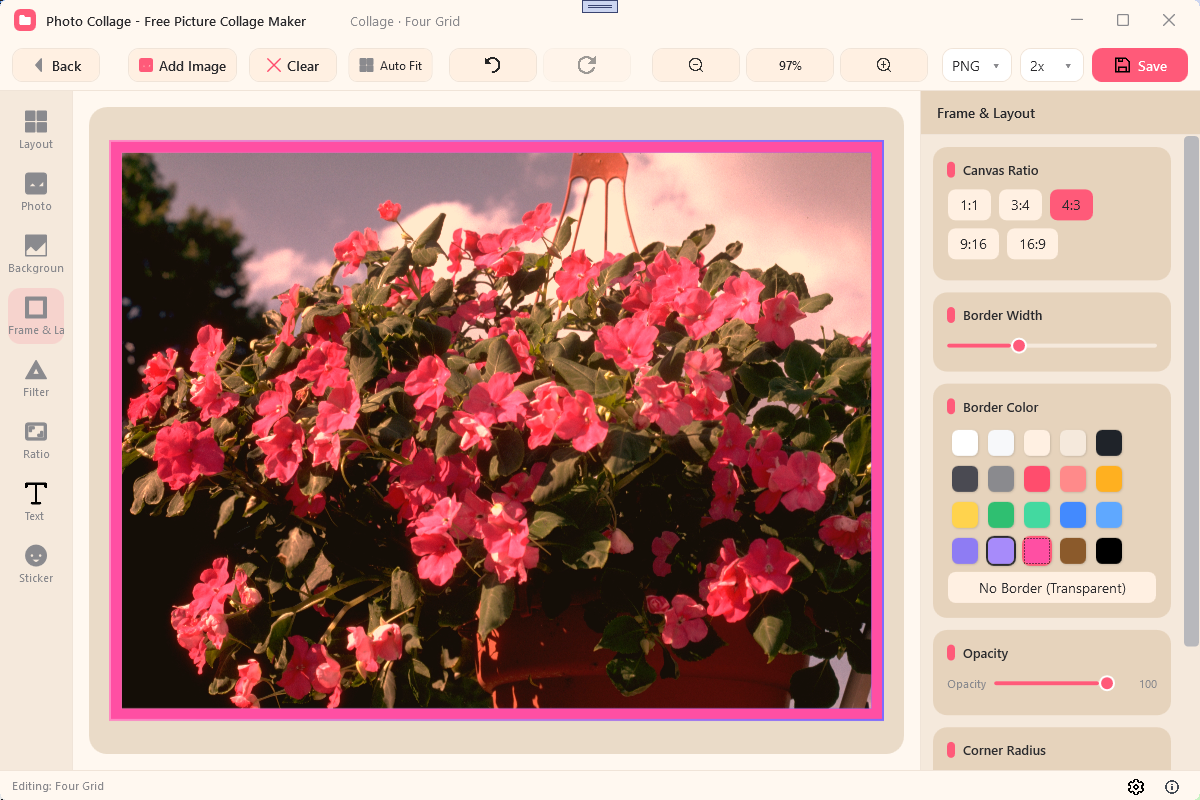
- 画布比例Canvas Ratio — 在「比例」或「边框与布局」面板选择:1:1 / 3:4 / 4:3 / 9:16 / 16:9pick 1:1 / 3:4 / 4:3 / 9:16 / 16:9 in the Ratio or Frame & Layout panel
- 边框宽度Border Width — 0–32,可调照片外框粗细0–32 for the frame thickness
- 边框颜色Border Color — 色板选择或「无边框(透明)」palette or "No Border (Transparent)"
- 圆角 / 间距Corner Radius / Spacing — 调整照片圆角与格子间距(0–64)round the photo corners and set slot spacing (0–64)
建议先想好发布平台再选比例:如正方形适合信息流,9:16 适合竖屏故事/短视频封面。Pick the ratio for where you will share first: square suits feeds, 9:16 suits vertical stories and covers.
背景Backgrounds
如何更换拼图背景?
How do I change the background?
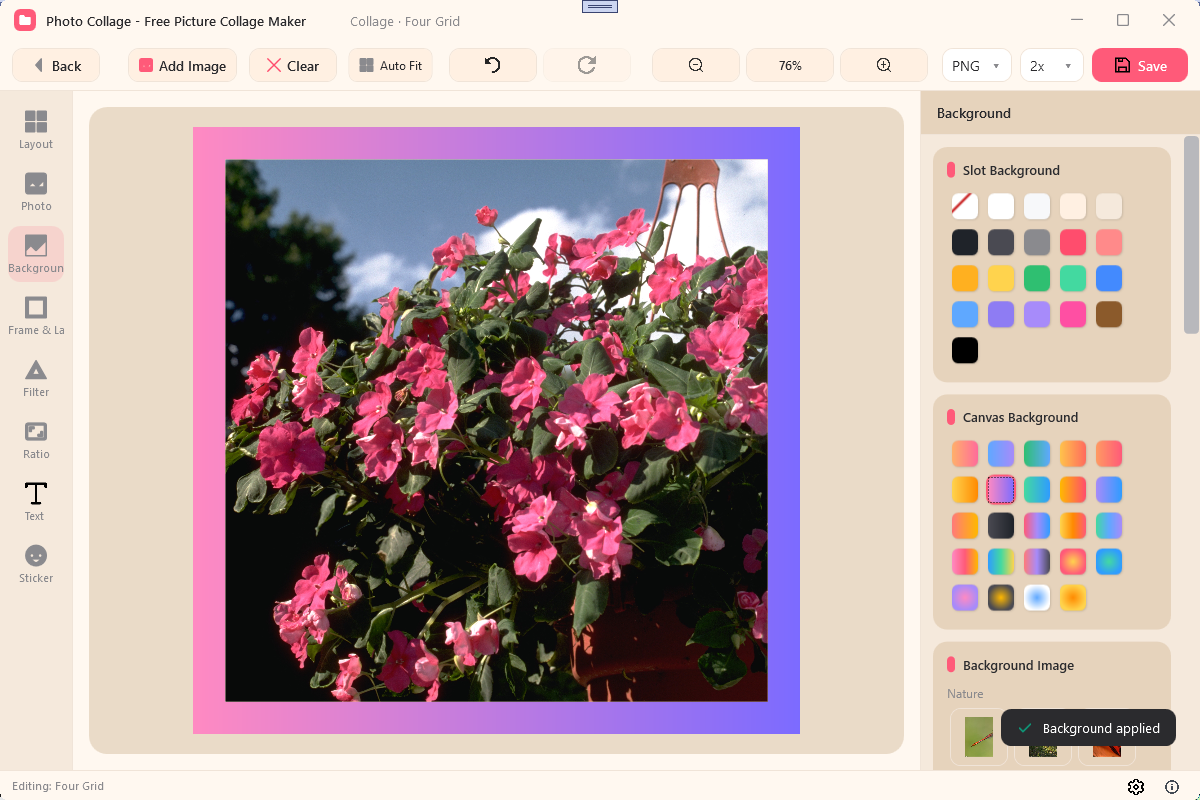
- 纯色Solid Color — 选纯色填充。网格模式下纯色用作「格子背景」,只填充空格fill with a solid color; in grid mode it works as "Slot Background" for empty cells
- 渐变Gradient — 多套两色/三色线性或径向渐变预设a set of two/three-color linear and radial presets
- 背景图Background Image — 内置分类背景图库(自然风景/大地沙漠/城市星空/几何图案/波点条纹/纹理质感/纸张复古等),也可点「选择图片背景」用自定图片built-in galleries (Nature, Land & Desert, City & Stars, Geometric, Dots & Stripes, Textures, Paper, …), or click "Choose Image" for your own picture
滤镜Filters
如何给照片加滤镜?
How do I apply filters to photos?
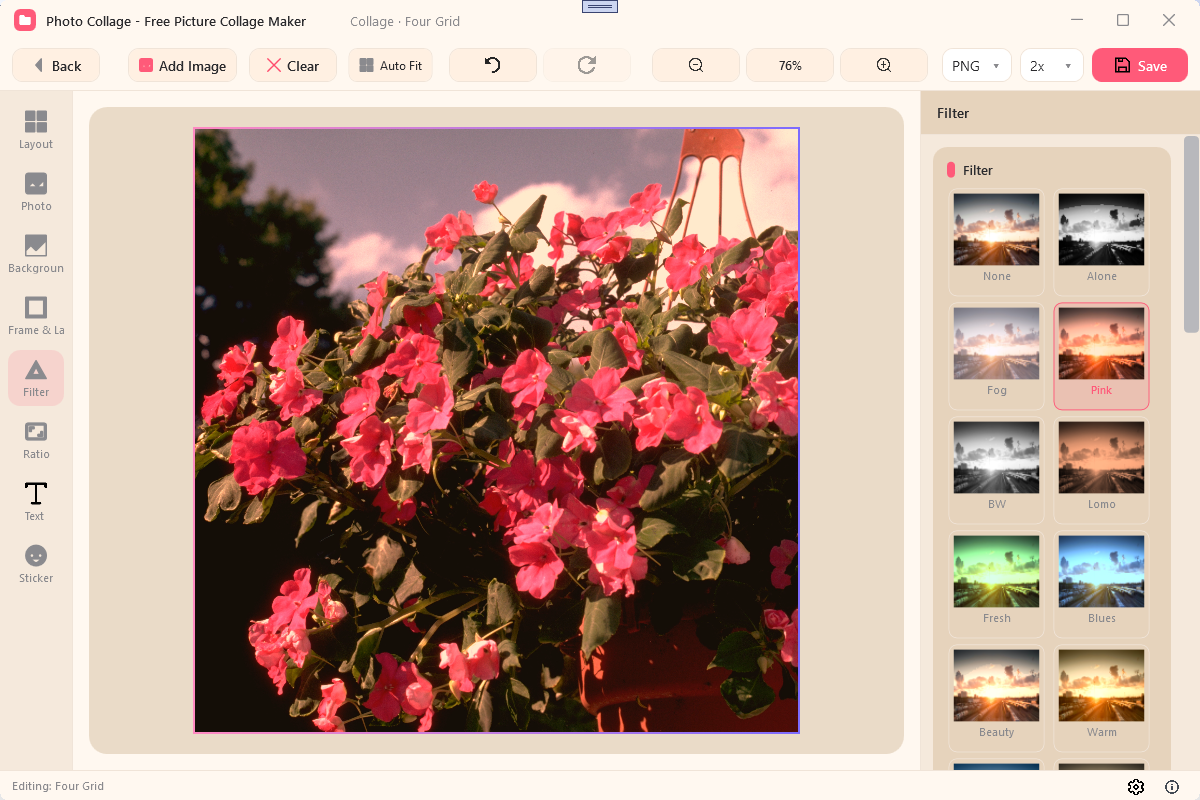
- 打开左侧「滤镜」工具,网格会显示 30+ 滤镜缩略图(如 Alone / Fog / BW / Lomo / Vintage / Film / Faded / Cream / Instax / Mosaic 等)Open the Filter tool to preview 30+ looks (e.g. Alone, Fog, BW, Lomo, Vintage, Film, Faded, Cream, Instax, Mosaic…)
- 点击缩略图立即应用:网格模式下作用于所有照片,自由排版模式下只作用于当前选中的照片Click a thumbnail to apply instantly — to all slots in grid mode, or only the selected photo in Free Style mode
- 选「None」即可一键还原Pick "None" to reset
文字Text
如何添加和美化文字?
How do I add and style text?
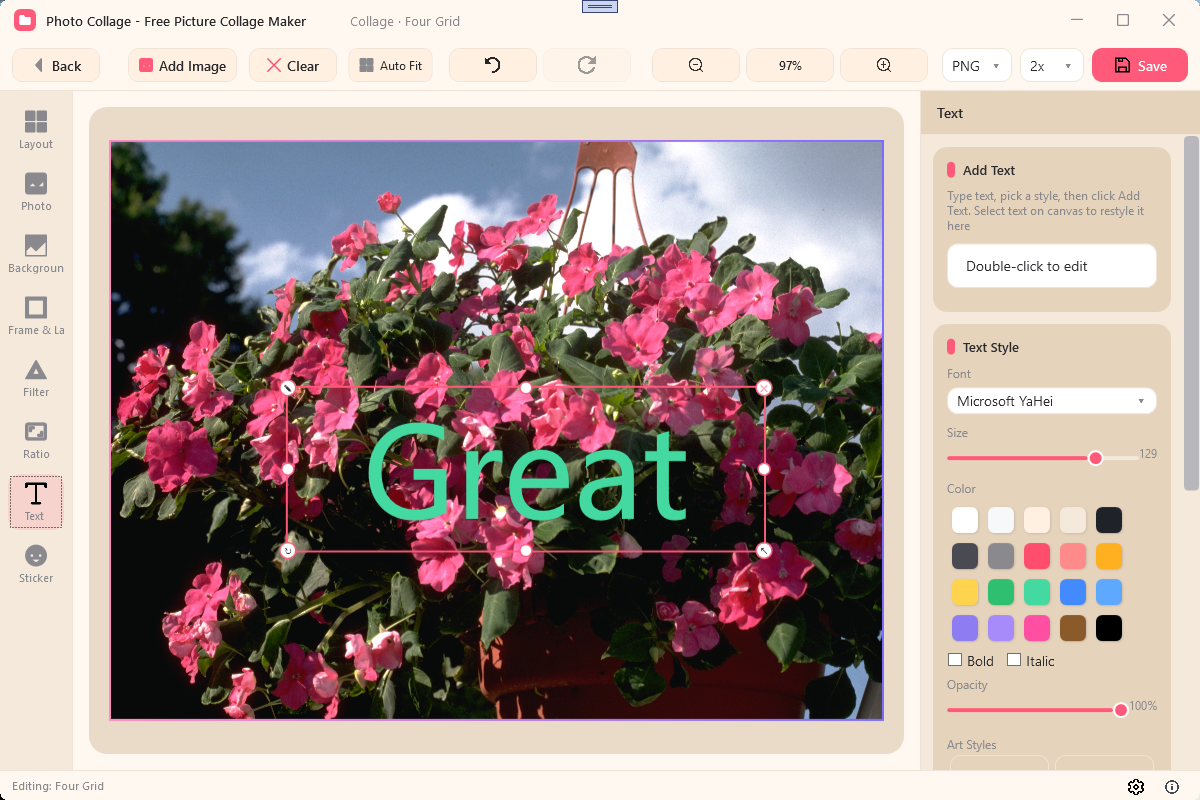
- 打开左侧「文字」工具,输入文字内容Open the Text tool and type your caption
- 选择字体、字号(8–160)、颜色、加粗/斜体,还可以套用艺术字样式(如霓虹/彩虹/描边/立体/长投影等)choose Font, Size (8–160), Color, Bold/Italic, and even an Art Style (Neon, Rainbow, Outline, 3D, Long Shadow…)
- 点「添加文字」放入画布,然后拖动移动、拖手柄缩放或旋转click "Add Text" to place it, then drag to move, resize or rotate with its handles
- 之后双击文字即可重新编辑内容,选中后右侧面板可直接改同款样式Double-click any text to edit the words; select it to restyle from the right panel
贴纸Stickers
如何添加贴纸?
How do I add stickers?
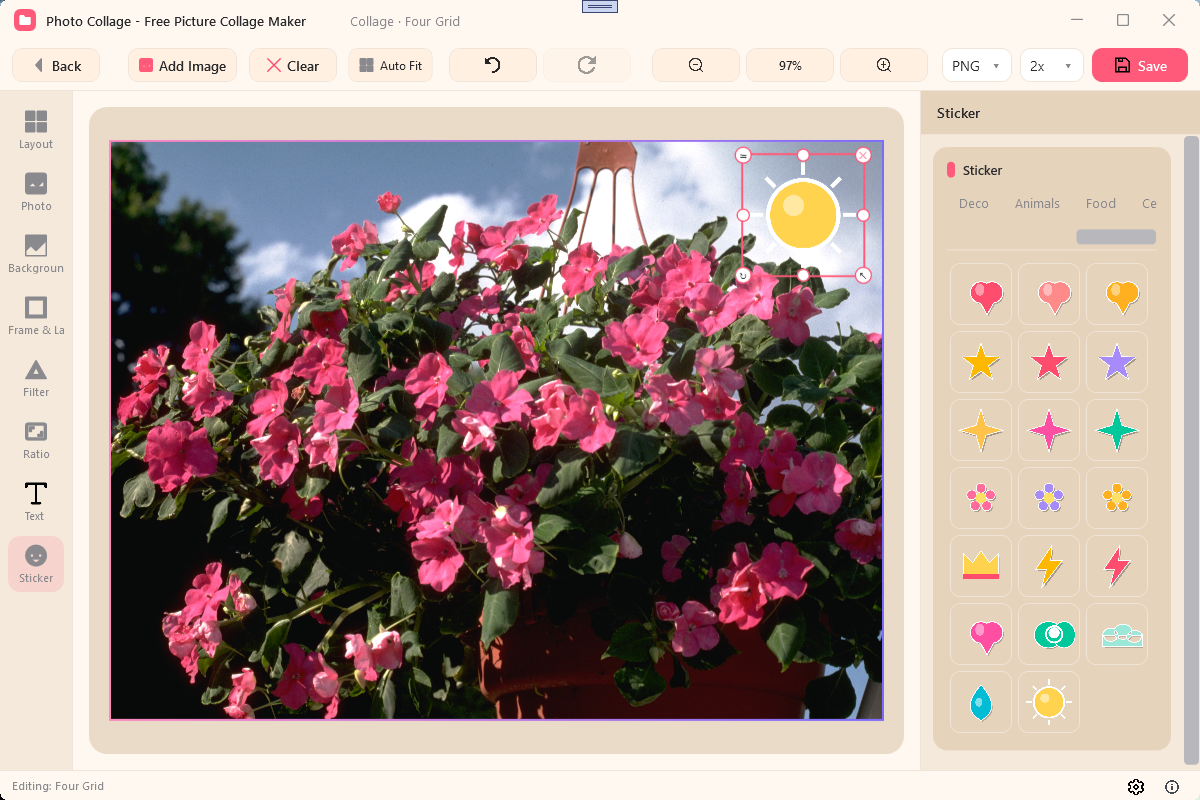
- 打开左侧「贴纸」工具,按分类浏览:装饰 / 动物 / 食物 / 庆祝 / 手势表情 / 自然天气 / 笑脸表情 / 心情爱心Open the Sticker tool and browse tabs: Deco / Animals / Food / Celebration / Gestures / Nature / Smileys / Love
- 点击贴纸即可放到画布上Click a sticker to place it on the canvas
- 像其他元素一样拖动、缩放、旋转;需要时可在图层面板调整前后顺序Move, resize and rotate it like any element; use the Layers panel to change stacking order
自由画布Free Style Canvas
如何使用自由排版?
How do I use Free Style?
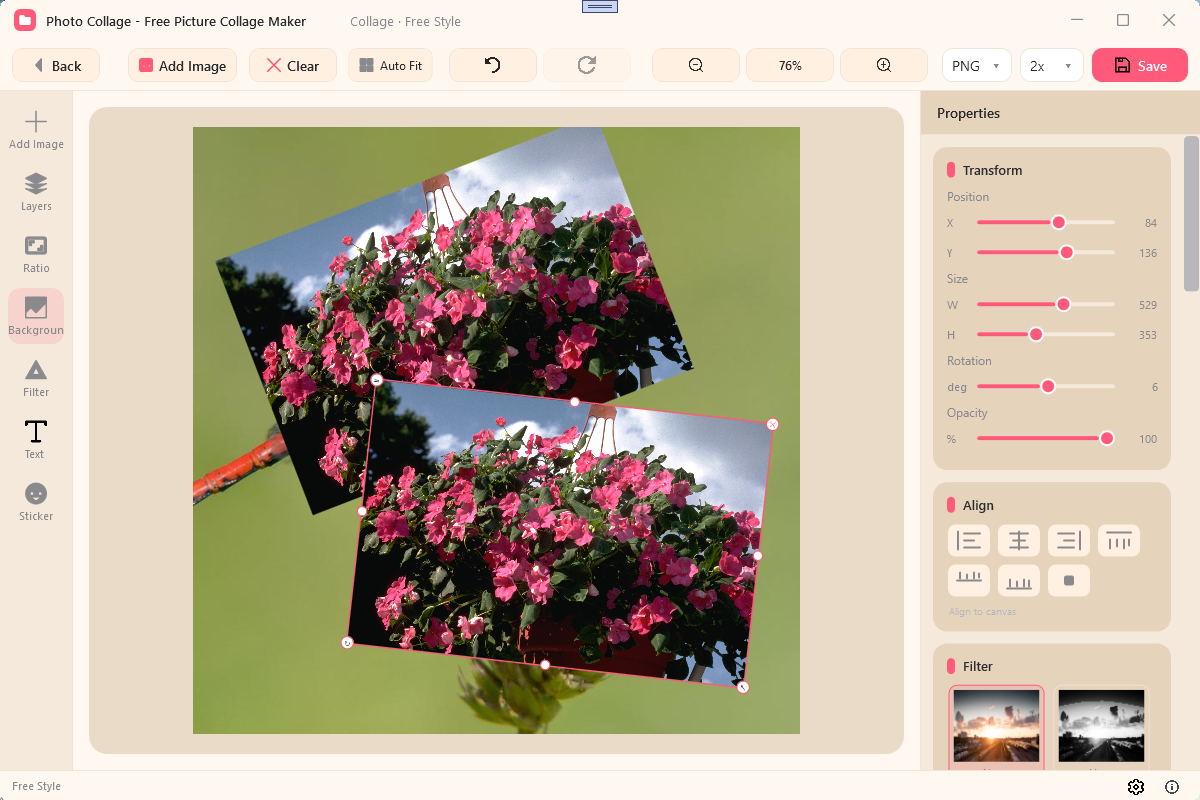
- 在首页点击「自由排版」卡片(“空白画布,自由摆放”),或在拼图编辑器的布局中选择「自由拼贴」Click "Free Style" on Home ("Blank canvas, arrange freely"), or pick the Free Style layout inside the editor
- 画布默认 1:1,可随时在比例面板切换 3:4 / 4:3 / 9:16 / 16:9the canvas starts at 1:1; switch to 3:4 / 4:3 / 9:16 / 16:9 any time
- 添加照片:点顶栏「添加图片」或把文件拖进画布,每张照片会以可移动元素出现add photos with "Add Image" or drag files in; each photo appears as a movable element
- 用文字/贴纸工具继续添加元素;选中元素后可拖动、缩放、旋转keep adding with the Text/Sticker tools; select an element to move, resize and rotate it
- 通过顶栏的 −/%/+/适配按钮控制画布缩放,最后按「保存图片」导出zoom the canvas with the −/%/+/Fit controls on the top bar, then press "Save" to export
元素与图层Elements & Layers
如何管理画布上的元素?
How do I manage elements on the canvas?
- 选中元素Select — 点击元素显示控制框;四角各有分工:左上=镜像(文字=编辑)、右上=删除、左下=旋转、右下=缩放(保比例);四条边中点手柄单独调整宽/高click an element to show its frame; each corner has a role: top-left = Mirror (for text = Edit), top-right = Delete, bottom-left = Rotate, bottom-right = Scale (aspect kept); edge middle handles resize width/height
- 右键菜单Right-click menu — 旋转 90° / 旋转 -90° / 镜像 / 裁剪 / 置顶 / 置底 / 删除Rotate 90° / Rotate -90° / Mirror / Crop / Bring to Front / Send to Back / Delete
- 图层面板Layers panel — 列出画布上的照片/文字/贴纸,点击选中元素;用置顶/置底按钮调整叠放顺序,也可删除lists photos, text and stickers; click to select an element; use Bring to Front / Send to Back buttons to reorder, or Remove
- 变换面板Transform panel — 精确设置位置 X/Y、尺寸 W/H、旋转角度与透明度,并可一键对齐画布set Position X/Y, Size W/H, Rotation and Opacity precisely, plus one-click align-to-canvas
- 元素属性Element style — 选中照片可单独加滤镜、裁剪或复制;文字可继续改内容与样式a selected photo can be filtered, cropped or duplicated; text keeps its own editable style
双击文字直接编辑;按 Delete 键可删除当前选中的元素。Double-click text to edit; press Delete to remove the selected element.
设计模板库Design Templates
有哪些现成的设计模板?
What ready-made design templates are available?
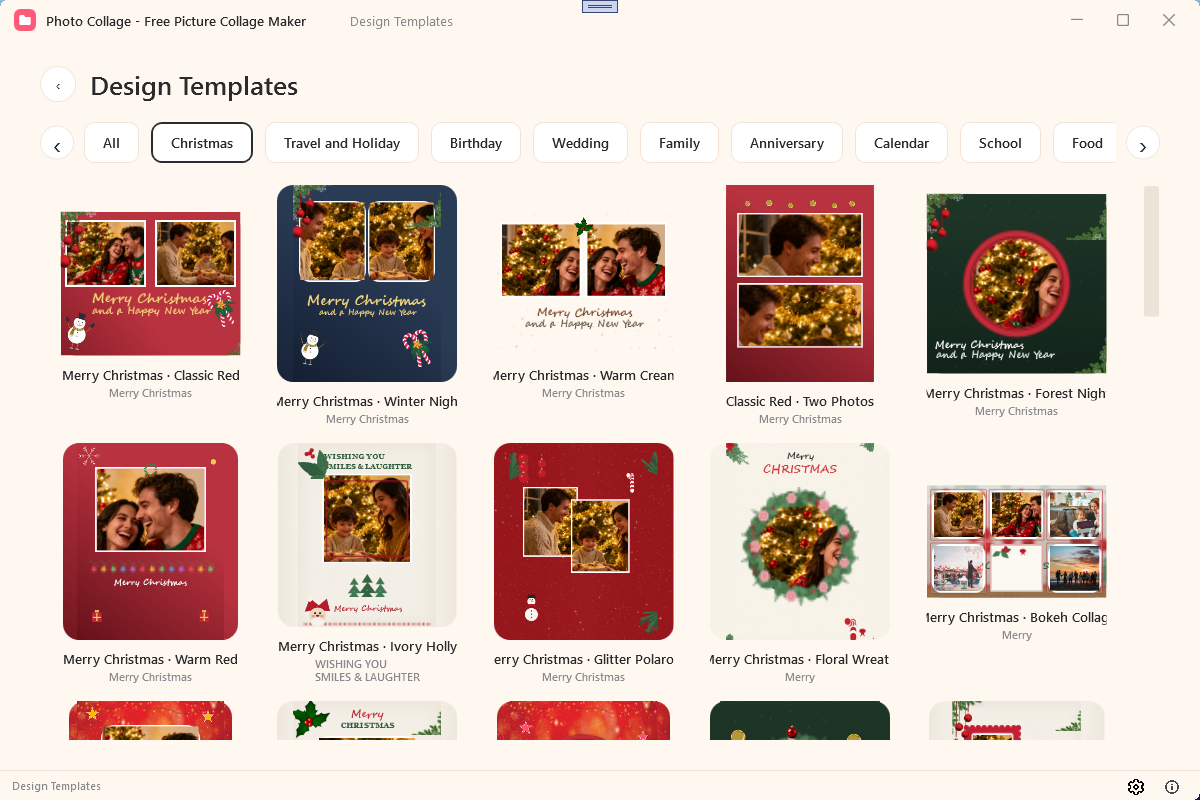
- 首页点「设计模板」卡片(“节日主题模板”)进入设计模板库,顶部可用分类筛选click "Designs" on Home ("Themed & festive templates") to open the gallery and filter by category chips
- 内置 1,300+ 套设计,覆盖 30+ 主题:圣诞 / 生日 / 婚礼 / 家庭 / 周年纪念 / 旅行与假期 / 开学 / 节日祝贺等1,300+ built-in designs across 30+ themes: Christmas, Birthday, Wedding, Family, Anniversary, Travel and Holiday, School, congratulations and more
- 首页的「分类」与「热门」区域也会展示常用主题与精选设计,点击即可进入the Categories and Popular sections on Home surface common themes and featured designs too
- 点击任意设计卡片即打开设计编辑器click any design card to open the Design Editor
设计编辑器Design Editor
如何在现成设计中放入自己的照片?
How do I put my photos into a ready-made design?
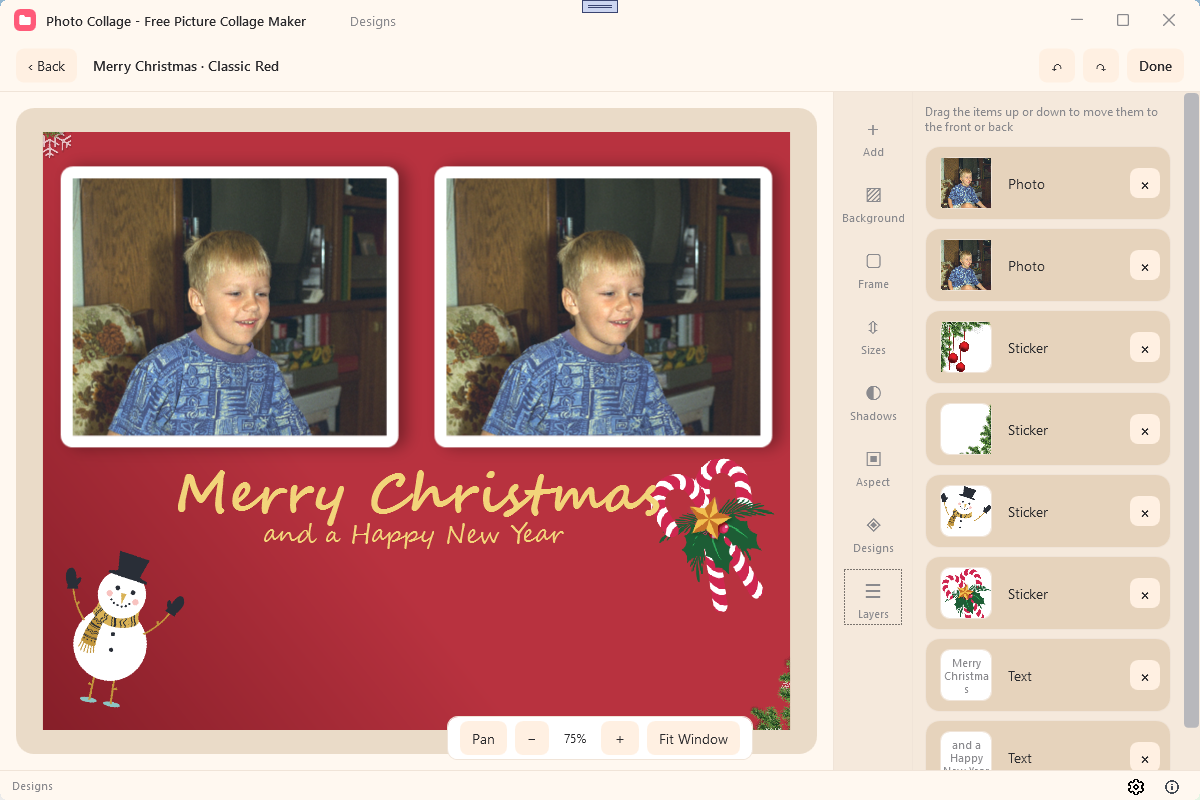
- 点击设计里的相框占位(“+”),从电脑选择照片放入click a photo frame placeholder ("+") in the design and choose a photo from your computer
- 每个相框可单独设置相框样式(无/圆角/邮票边/拍立得/拱形)、亮度、饱和度、色相,以及整体边距、间距与阴影each frame can be restyled (None / Rounded / Stamp / Polaroid / Arch) with per-photo Brightness/Saturation/Hue plus margins, spacing and shadows
- 不满意可随时「切换设计」换一套同主题模板use "Switch Design" to try another template from the theme any time
- 完成后点「完成」,在菜单中选择:保存 / 另存为(PNG/JPG)/ 打印when done press "Done" and choose: Save / Save As (PNG/JPG) / Print
设计编辑器内“添加文字/添加贴纸”与撤销/重做按钮目前显示为“即将上线”,添加素材请使用模板自带的相框。The Design Editor's "Add Text/Add Sticker" and Undo/Redo buttons currently show "Coming soon" — add content through the template's photo frames.
保存与导出Save & Output
保存的图片去哪里了?
Where do saved images go?
- 导出目录Output Folder — 默认保存到
图片\PhotoCollage,可在设置的「导出目录」中修改defaults toPictures\PhotoCollage; change it under Output Folder in Settings - 格式与分辨率Format & resolution — 保存前选择 PNG 或 JPG,以及 1x / 2x / 4x 分辨率(默认 2x 高清)choose PNG or JPG and 1x / 2x / 4x resolution before saving (2x HD by default)
- 自动命名Auto naming — 文件名为
collage_时间戳.ext,不会覆盖旧图files are namedcollage_timestamp.extso nothing is overwritten - 保存反馈Feedback — 成功后右下角提示“已保存到 …”,可直接「打开文件夹 / 打开图片」a "Saved to …" message offers Open Folder / Open Image links
- 我的作品 vs 我的保存My Works vs My Saves — 首页「我的作品」记录设计编辑器保存的可再编辑拼图;“我的保存”列出所有导出的图片文件(点击用系统看图工具打开)。注意:快速拼图和自由排版的保存只写文件,不自动进入「我的作品/我的保存」列表My Works on Home lists editable collages saved from the Design Editor; My Saves lists all exported images (click to open with the OS viewer). Note: Quick Collage and Free Style saves write files only and are not automatically added to My Works / My Saves
从「最近作品 / 我的保存」列表删除条目不会删除磁盘上的图片文件。Removing items from Recent Collages / My Saves does not delete the image files on disk.
设置与语言Settings & Language
如何更改界面语言与主题?
How do I change the language and theme?
- 点击窗口右下角的齿轮图标打开设置click the gear icon at the bottom-right of the window
- 在「语言」下拉框选择:跟随系统 / 中文 / English / 日本語 / 한국어 / Deutsch / Русскийpick a Language: Follow System / 中文 / English / 日本語 / 한국어 / Deutsch / Русский
- 在「主题」中选择浅色或深色,立即生效choose Light or Dark theme — applied immediately
- 如需修改默认保存位置,在「导出目录」中浏览选择文件夹to change where images are saved, Browse a new Output Folder
教程与评分弹窗是什么规则?
How do the tutorial and rating prompts work?
- 第一次启动约 3 秒后,应用会自动在浏览器打开本教程页on the very first launch the app opens this tutorial in your browser after ~3 seconds
- 之后每第 3 次启动会弹出一次教程询问窗(「现在阅读 / 稍后再说」,可勾选“不再显示”)every 3rd launch afterwards asks if you want the tutorial ("Read Now / Later", with a "Don't show again" option)
- 关闭应用时会弹一次评分窗,勾选后不再打扰closing the app may show a one-time "Rate Us" prompt
使用技巧Tips
如何更高效地使用 Photo Collage?
How do I get the most out of Photo Collage?
- 先选比例再排版Pick the ratio first — 确定发布平台后先设画布比例,避免成品被裁切set the canvas ratio for your target platform before arranging so nothing gets cropped later
- 网格图直接改布局Switch layouts freely — 照片放好后仍可切换任意模板,软件会自动重新排列,不满意再切回来即可after photos are in, switch to any other template — photos reflow automatically and you can switch back any time
- 拖动分隔线微调Drag the dividers — 网格模式拖动格子分隔线,突出某张主图in grid mode drag the dividers to make one photo stand out
- 滤镜可重置Filters are reversible — 不满意时点「None」即可还原,网格模式下会一次应用到所有照片tap "None" to reset; in grid mode a filter applies to every photo at once
- 节日用设计模板Use Designs for holidays — 做贺卡/邀请函直接搜设计模板分类(圣诞、生日、婚礼…),放照片微调即可for greeting cards and invites, start from a Design template (Christmas, Birthday, Wedding…) and just drop photos in
- 双击文字再编辑Double-click text to edit — 放好文字后可随时双击修改内容,不必重做any placed text can be edited later by double-clicking it
常见问题FAQ
点保存时提示“请先添加照片再保存”?
Saving shows "Add photos before saving"?
说明画布上还没有照片。先添加/拖入至少一张照片再点保存即可。
The canvas has no photo yet. Add or drag in at least one photo, then save again.
保存后找不到图片文件?
I cannot find my saved image?
保存成功后的提示条里有「打开文件夹」按钮可直接跳转;也可到设置的「导出目录」查看或修改默认位置。
Use "Open Folder" on the success message to jump straight there, or check/change the Output Folder in Settings.
保存过的拼图还能继续编辑吗?
Can I keep editing a saved collage?
可以。首页「我的作品」/「最近作品」里点击作品即可在设计编辑器中再次打开编辑。
Yes. Click a collage in My Works / Recent Collages on Home to reopen and keep editing it.
界面语言能切换吗?
Can I switch the interface language?
可以。点击窗口右下角齿轮进入设置,在「语言」下拉中选择即可(支持 7 种语言)。
Yes. Open Settings via the gear icon and pick a Language — 7 languages are supported.