
启动应用并选择模式Launch the app and pick a mode
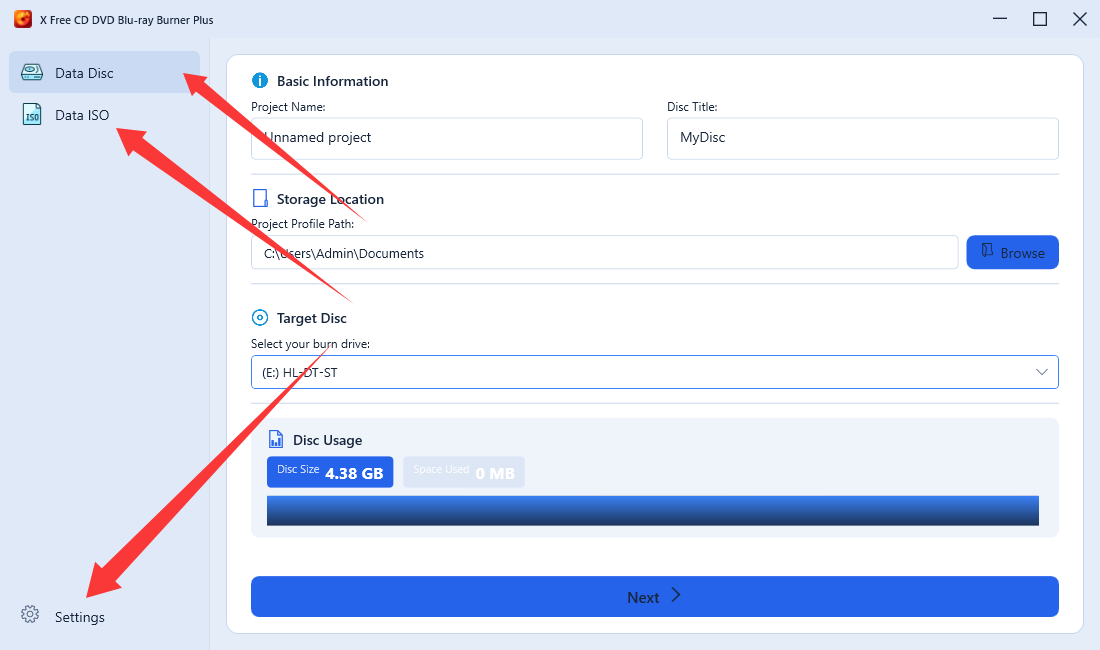
启动应用后,通过左侧导航在三种模式间切换:Data Disc(刻录数据光盘)、Data ISO(制作 ISO 镜像)、Settings(设置)。本流程以「Data Disc」为例。 After launching, use the left sidebar to switch between three modes: Data Disc (burn a data disc), Data ISO (create an ISO image), and Settings. This guide uses "Data Disc" as the example.
配置工程信息Set up the project
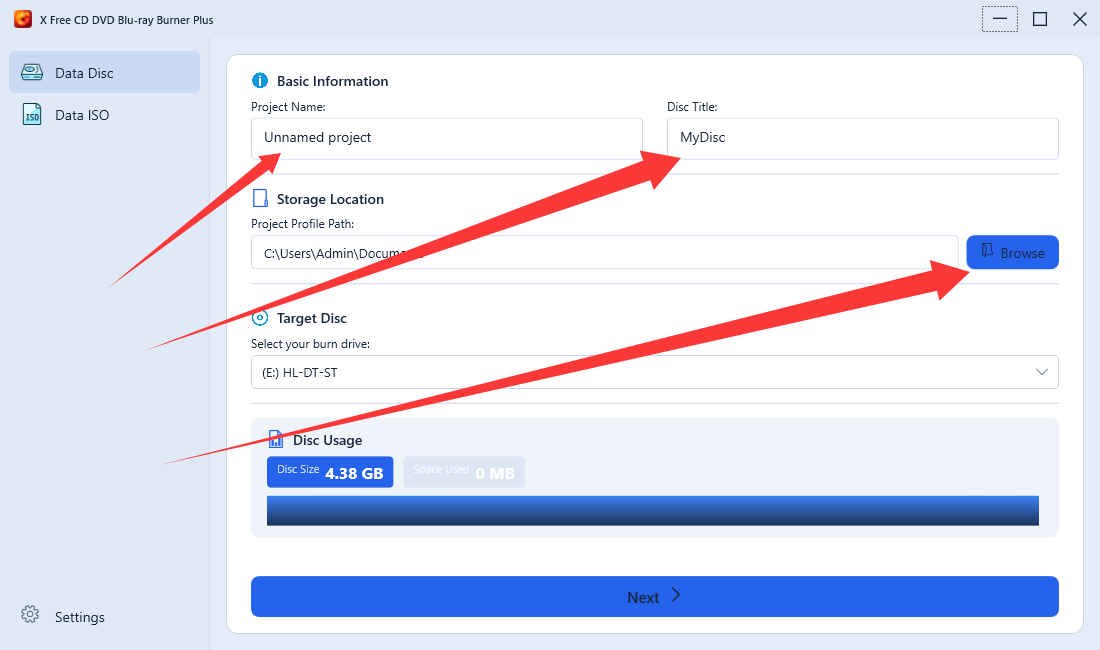
在初始化页填写:工程名称 Project Name(工程标识)、光盘卷标 Disc Label(写入光盘的卷标名,可选)、保存位置 Storage Location(刻录日志的保存目录,点「Browse」选择)。 On the init page, fill in: Project Name (project id), Disc Label (the volume label written to the disc, optional), and Storage Location (where burn logs are saved — click "Browse" to pick a folder).
选择目标光驱Choose the target drive
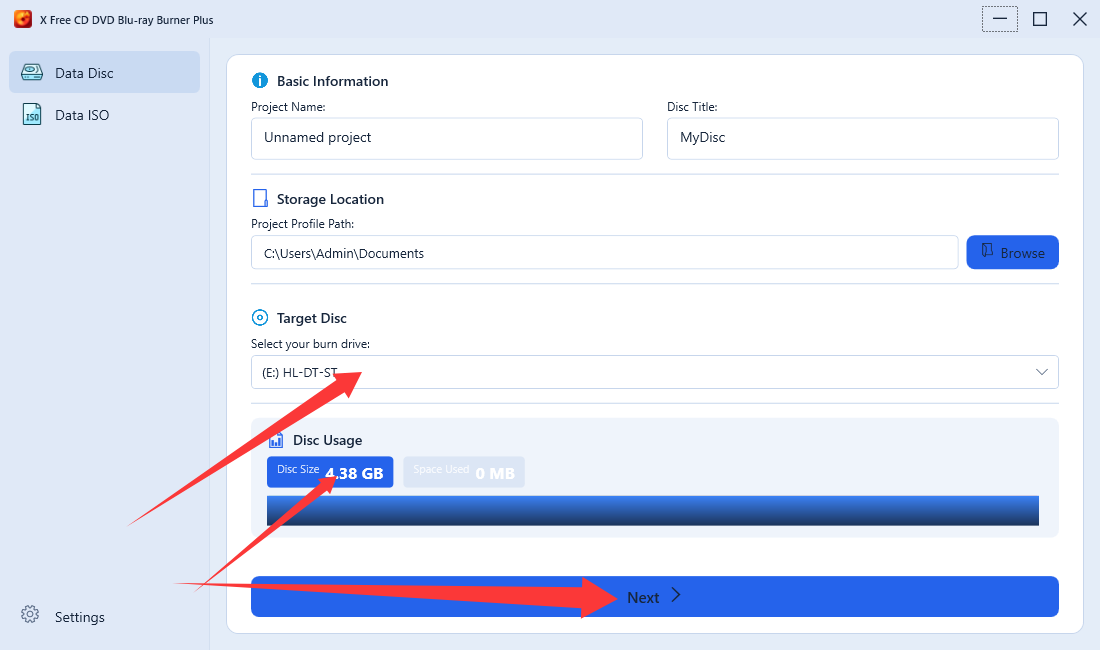
在「目标光驱 Target Disc」下拉框中选择已插入可写光盘的驱动器,下方「Disc Usage」会实时显示光盘总容量与已用空间。未检测到光驱时会提示「Disc not found」,插入光盘后自动刷新。 Pick the drive with a writable disc from the "Target Disc" dropdown; "Disc Usage" below shows the disc's total and used space in real time. If no drive is detected you'll see a "Disc not found" prompt — insert a disc and it refreshes automatically.
添加文件Add files
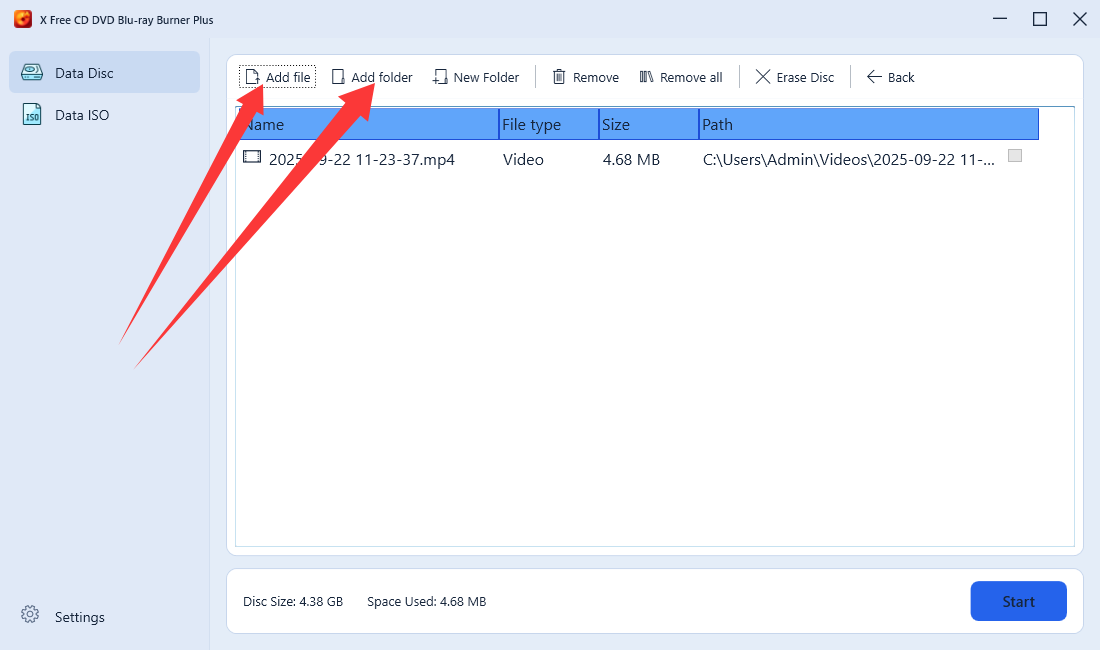
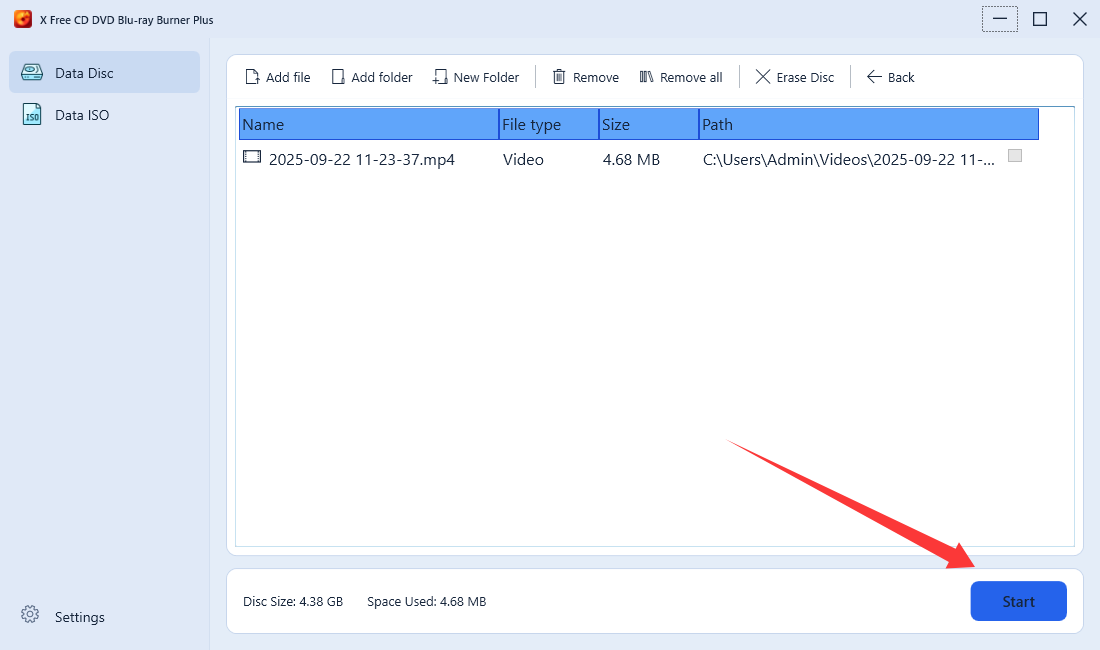
点击「Next」进入文件列表页,可用四种方式添加:Add File(多选文件)、Add Folder(整个文件夹)、New Folder(在光盘中新建文件夹)、直接拖拽文件/文件夹到窗口。选中后可用 Remove 移除、Remove All 清空、Back 返回上一步。 Click "Next" to open the file list. Four ways to add: Add File (multi-select), Add Folder (whole folders), New Folder (create a folder on the disc), or drag & drop files into the window. Use Remove / Remove All to delete items and Back to go back.
检查容量并开始刻录Check capacity and start
底部显示 Disc Size(光盘总容量)与 Space Used(已用空间)。文件总大小超过可用空间时会弹出提示,请移除部分文件。确认无误后点击「Start」开始刻录。 The bottom bar shows Disc Size and Space Used. If the total exceeds the free space the app warns you — remove some files. Then click "Start" to begin.
刻录与完成Burning and done
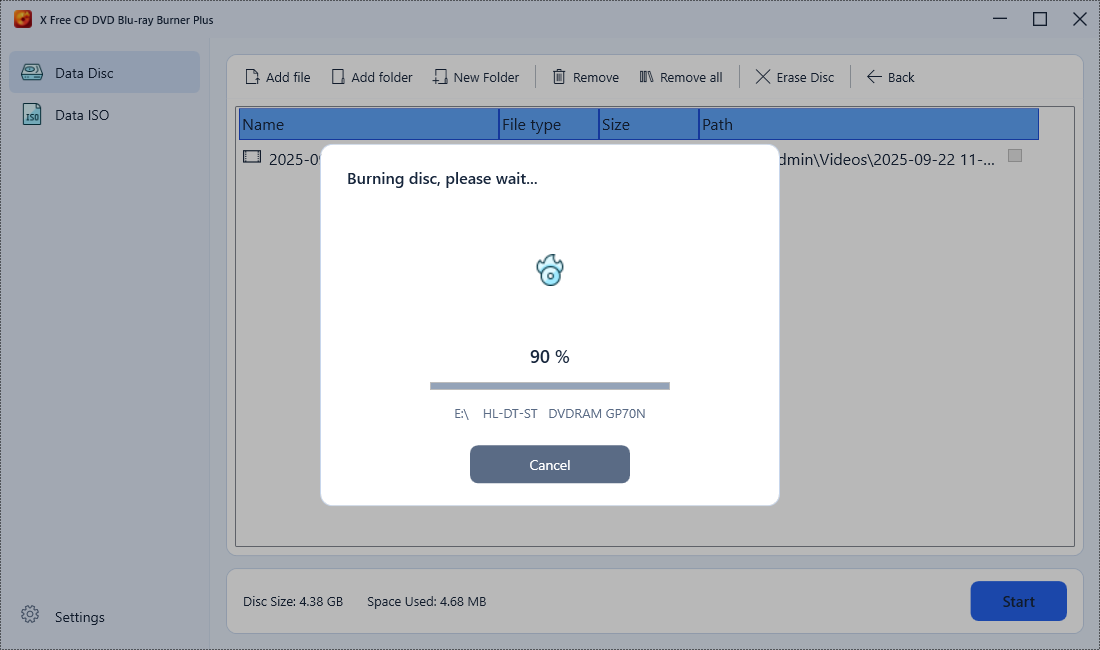
进度对话框依次显示「复制文件 → 刻录 → 校验」三个阶段,可随时点「Cancel」取消(需二次确认)。完成后应用自动校验数据并弹出光盘;点击「Open Disc」查看结果,或「Back」返回继续刻录。 The progress dialog runs "copy files → burn → verify". You can "Cancel" anytime (with confirmation). When done, the app verifies the data and ejects the disc; click "Open Disc" to view it or "Back" to continue.
制作 ISO 镜像Create an ISO image
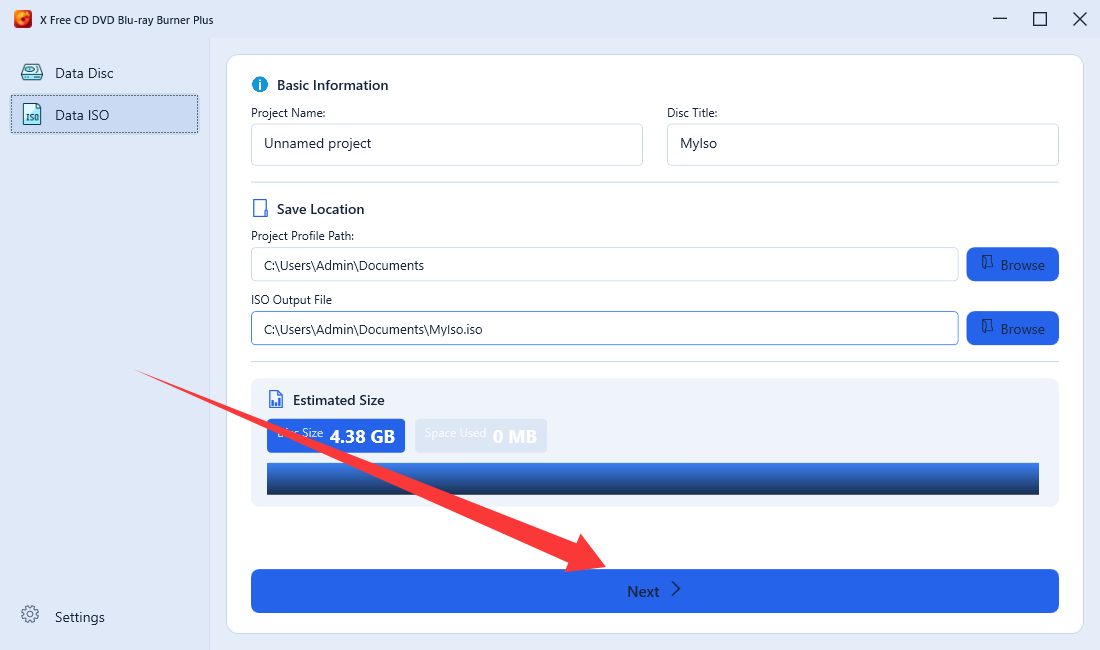
- 左侧选择「Data ISO」Select "Data ISO" in the sidebar.
- 填写工程名称与卷标,在「ISO 输出文件 ISO Output File」一行点「Browse」选择镜像保存路径与文件名Enter the project name and label, then click "Browse" next to "ISO Output File" to choose where the image is saved.
- 点击「Next」进入文件列表页,添加文件(方法同第 4 步)Click "Next", add files (same as step 4).
- 点击「Start」生成镜像,完成后点「Open」打开镜像所在文件夹Click "Start" to build the image; click "Open" to locate the file.
擦除可重写光盘Erase a rewritable disc
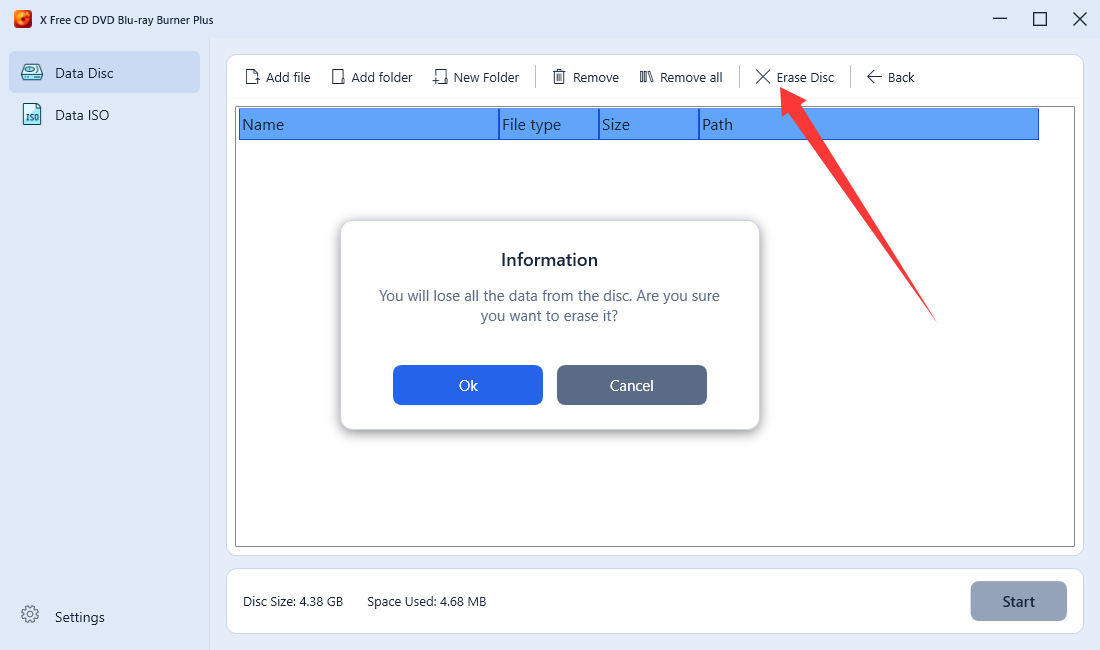
- 在「Data Disc」或「Data ISO」文件列表页点击工具栏「Erase Disc」Click "Erase Disc" on the toolbar of the Data Disc or Data ISO file list.
- 在确认对话框中点击「OK」Confirm by clicking "OK".
- 等待擦除完成,点击「Eject」弹出光盘即可重新使用Wait for it to finish, then click "Eject" to reuse the disc.
设置:主题 / 语言 / 托盘Settings: theme / language / tray
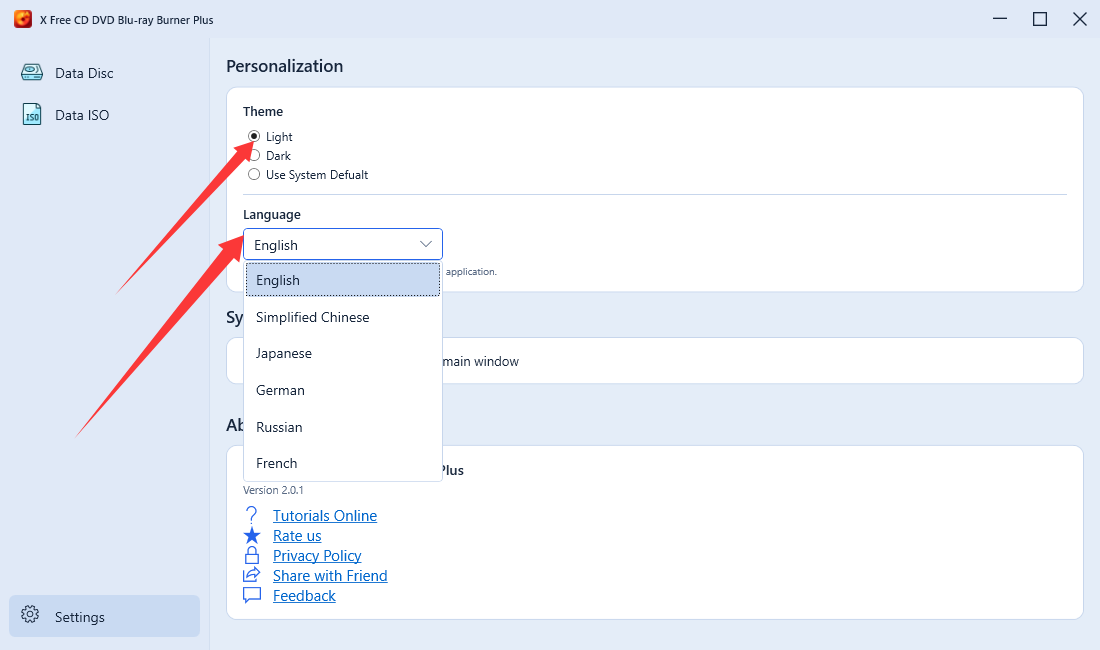
- 左侧导航进入「Settings」设置页Open "Settings" from the sidebar.
- 主题:选择 Light 浅色 / Dark 深色 / Use system settings 跟随系统,即时生效Theme: pick Light, Dark, or Use system settings — applies immediately.
- 语言:下拉框选择 6 种语言之一(English / 简体中文 / 日本語 / Deutsch / Русский / Français),重启后生效Language: pick one of 6 languages (English / 简体中文 / 日本語 / Deutsch / Русский / Français); takes effect after restart.
- 托盘:勾选「Minimize to tray when closing the main window」,关闭窗口时最小化到托盘而非退出Tray: check "Minimize to tray when closing the main window" to keep the app in the tray on close.
常见问题FAQ
支持 CD / DVD / Blu-ray 的空白可写与可重写介质,刻录时使用 ISO9660 + UDF 文件系统。
Blank writable and rewritable CD / DVD / Blu-ray media are supported, written with the ISO9660 + UDF file system.
可以。进度对话框上有「取消」按钮,确认后即终止;但中断可能使光盘无法继续使用,建议仅在必要时取消。
Yes — use the "Cancel" button and confirm. Interrupting may render the disc unusable, so only cancel when necessary.
应用会在刻录完成后自动校验(Verify)数据,校验通过后弹出光盘方便取出;「Open Disc」可再次查看内容。
The app verifies the data after burning, then ejects the disc. Click "Open Disc" to view it again.
完全本地运行。文件只会在本机被复制到临时目录并写入光盘,无任何网络上传;刻录完成后临时文件自动清理。
Everything runs locally. Files are only copied to a temp folder and written to the disc — no uploads; temp files are cleaned up automatically.
需要满足两个条件:① 列表中有文件;② 在 Data Disc 模式下已选择插有可写光盘的光驱。
Two conditions are required: ① the file list is not empty; ② in Data Disc mode, a drive with a writable disc is selected.